While lurking on eBay on a nice spring day of 2012, I have been lucky to obtain a real gem, for a very cheap price indeed: a special micro-focus X-ray tube, with a Be window on the beam port, mostly for spectral analysis or fluoroscopic scanning purposes, for up to 150 kilovolts with forced oil cooling at high powers; made by a now-defunct American EG&G Astrophysics company…
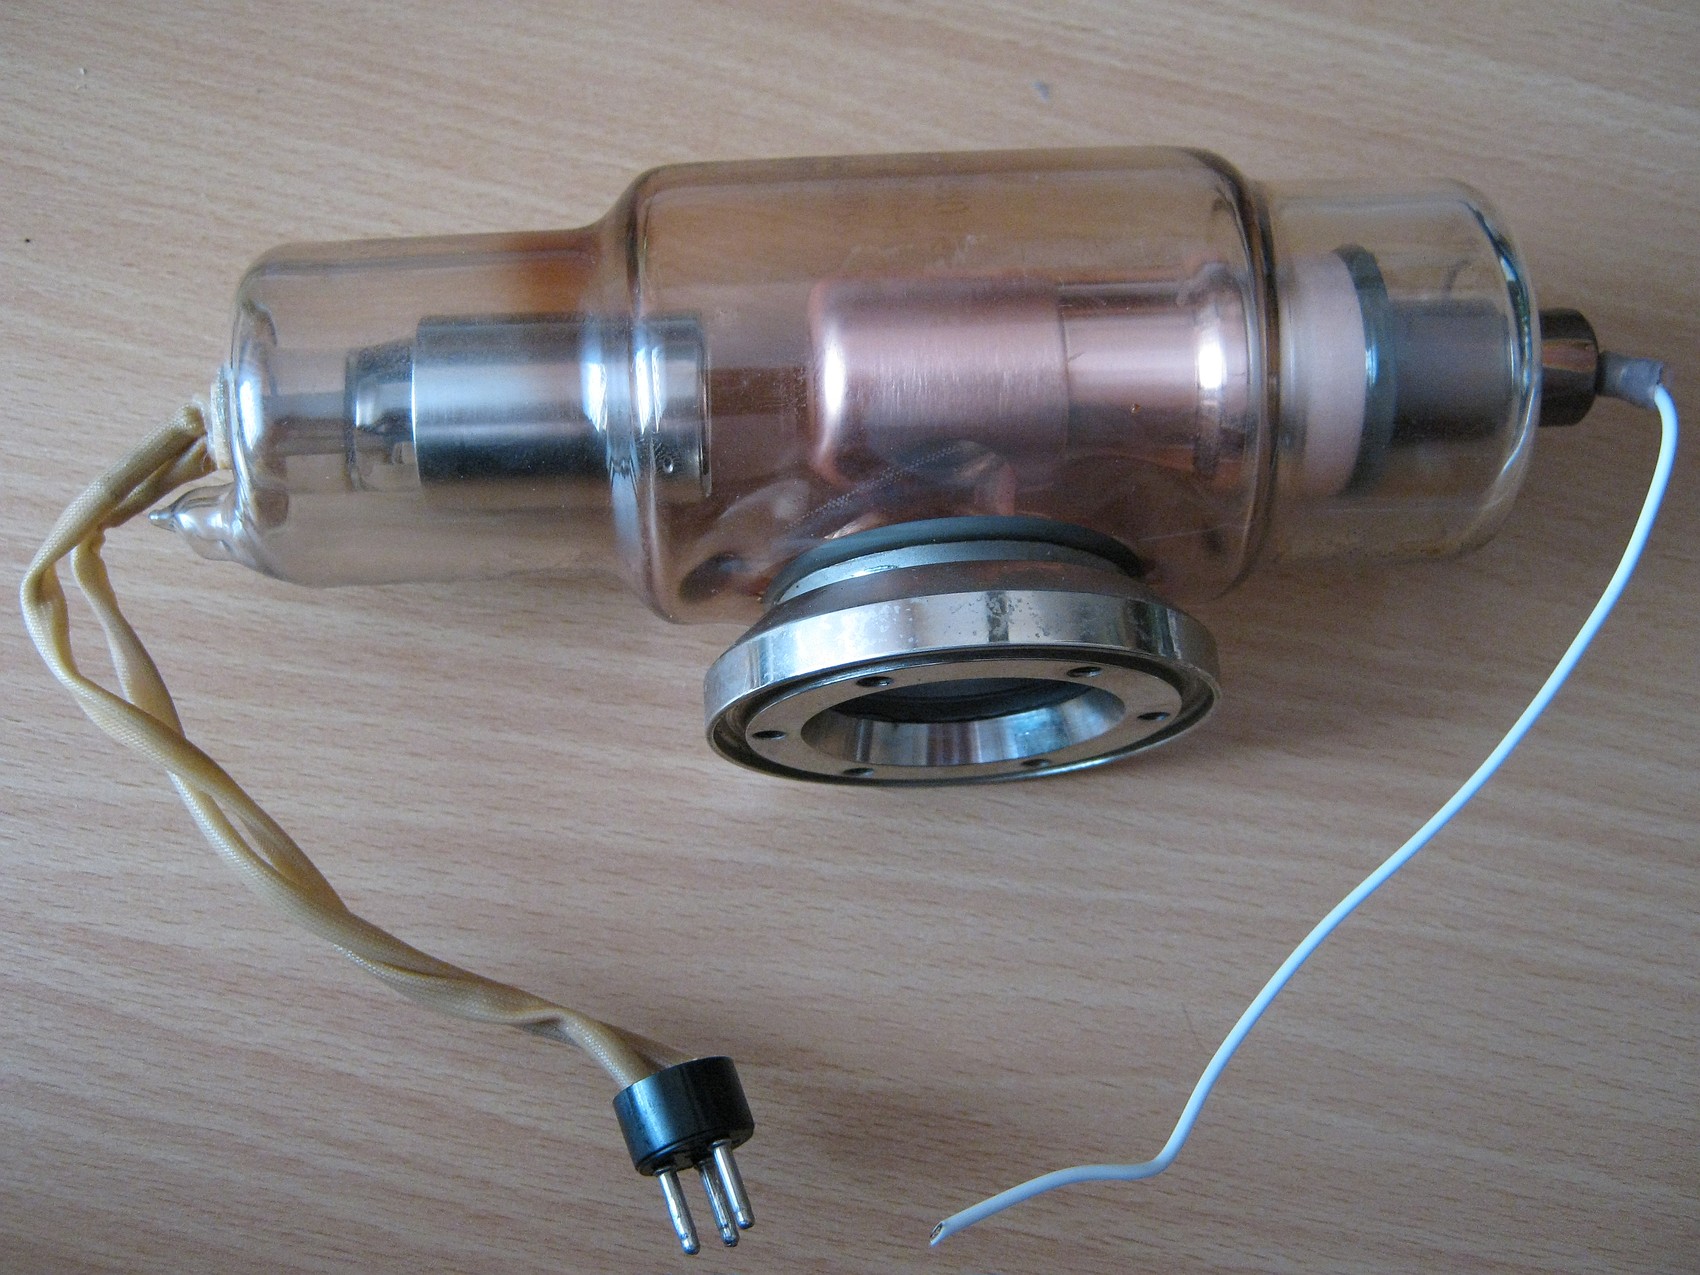

“TORREX ASTRO 150D”. Such a little fragile beast, isn’t it?
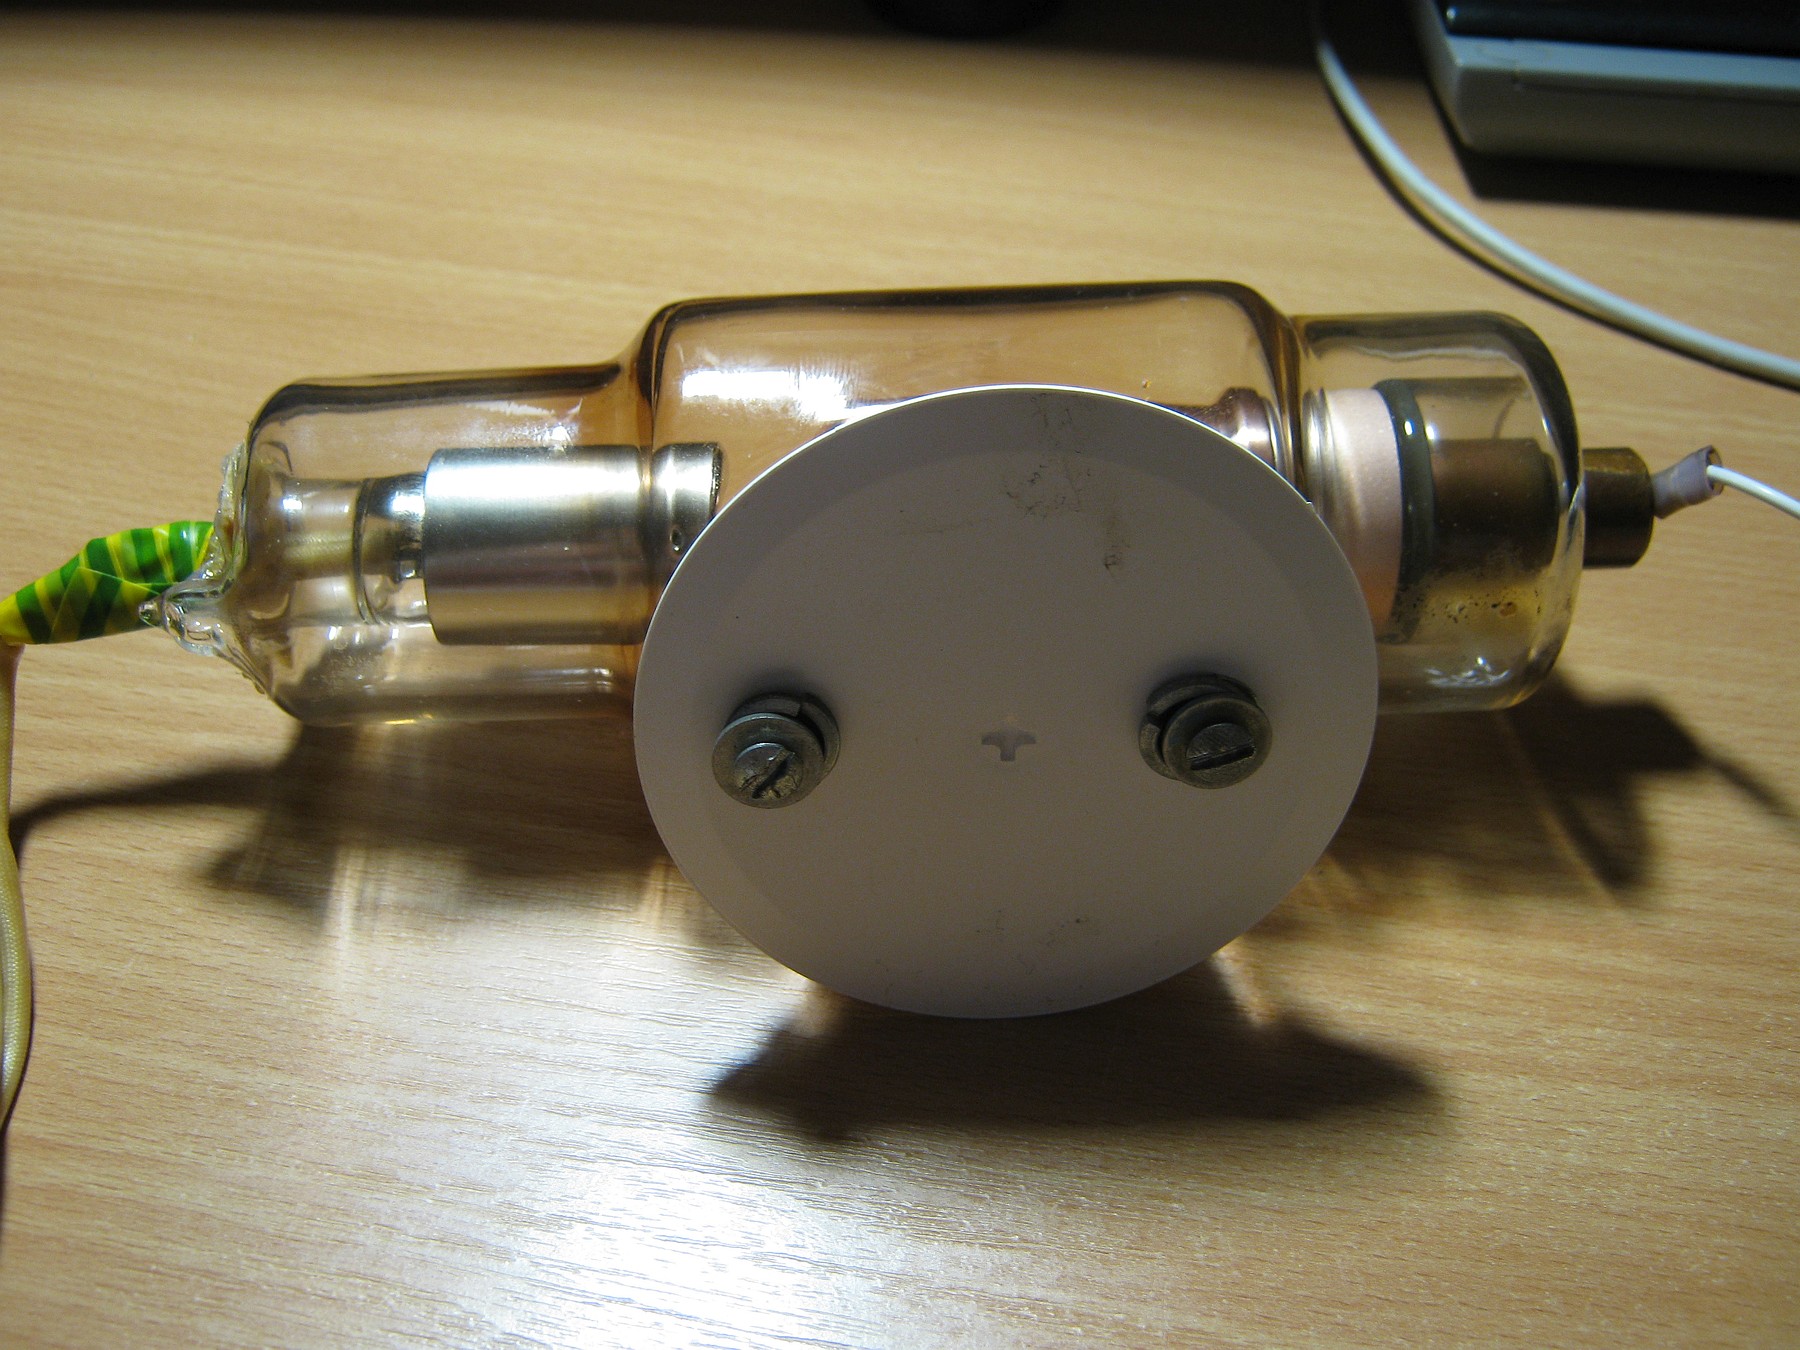
2nd photo: beam port with the beryllium window, 3rd: a protective plastic cover I’ve made
Well, of course I would not let such a beauty to sit in layers of dust for decades without testing her on some high voltage beforehand! So, for those who haven’t read my X-ray experments with a Czechoslovak dental Chirana tube, do so, before proceeding here. All the details, how it all works, including how I protect myself from such soft x-radiation, is explained there.
 AGFA CURIX ORTHO REGULAR screen
Green-emitting rare earth based
The whole setup has not changed much since then. However, for more kilovoltage and power, I’ve modified the ZVS flyback driver to drive two flybacks with high voltage secondaries in series. As you can see the result was hellish, with high voltage arc striking distance being as much as 15 centimeters without a load – which roughly corresponds to 70-75 kilovolts output. But since it is not a stabilized supply, it is a nice idea to have some headroom in kilovoltage, as it will drop considerably on load.
The former blue-emitting screen “DuPont Quanta Rapid” has been substituted with a green “AGFA CURIX Ortho”, as cameras tend to be more sensitive to green than to blue.
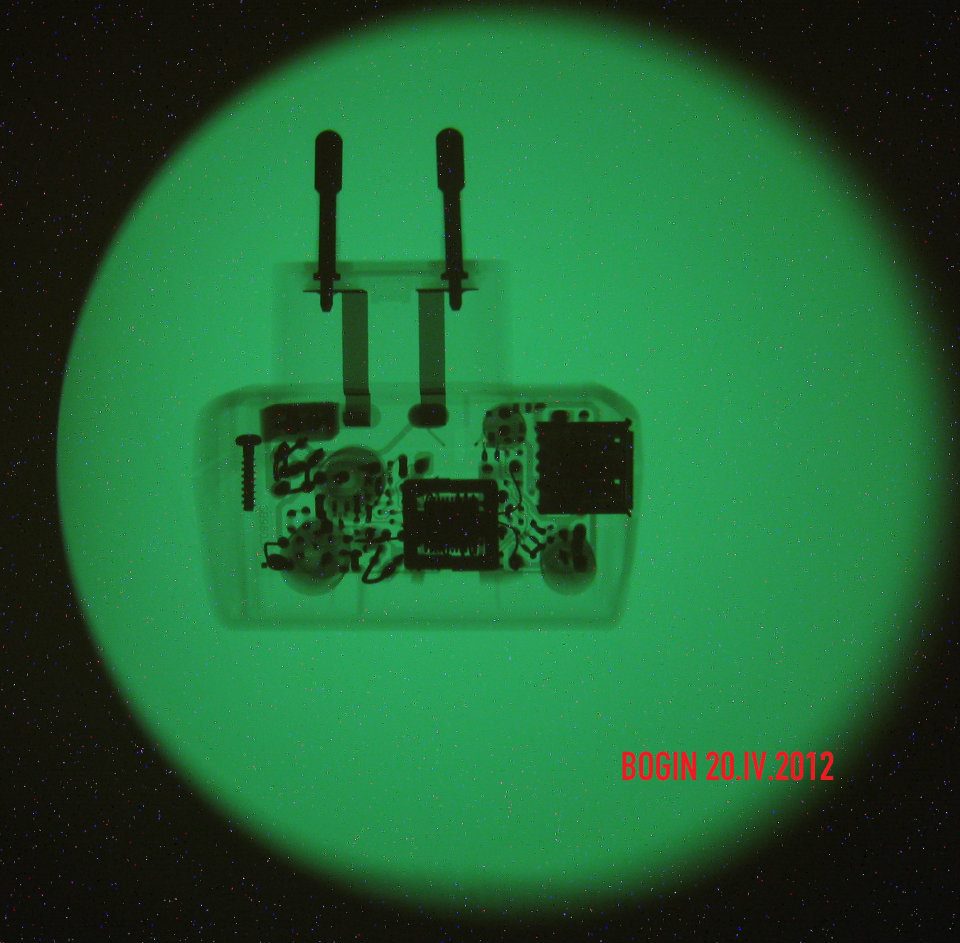
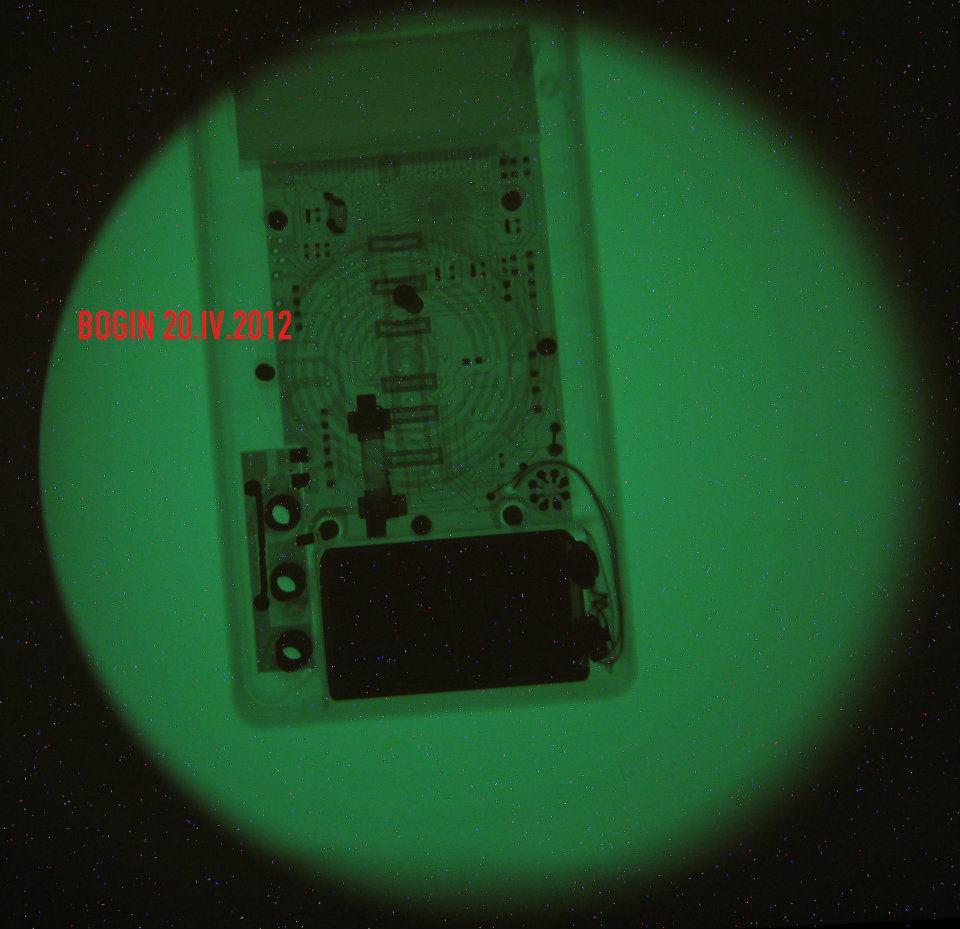
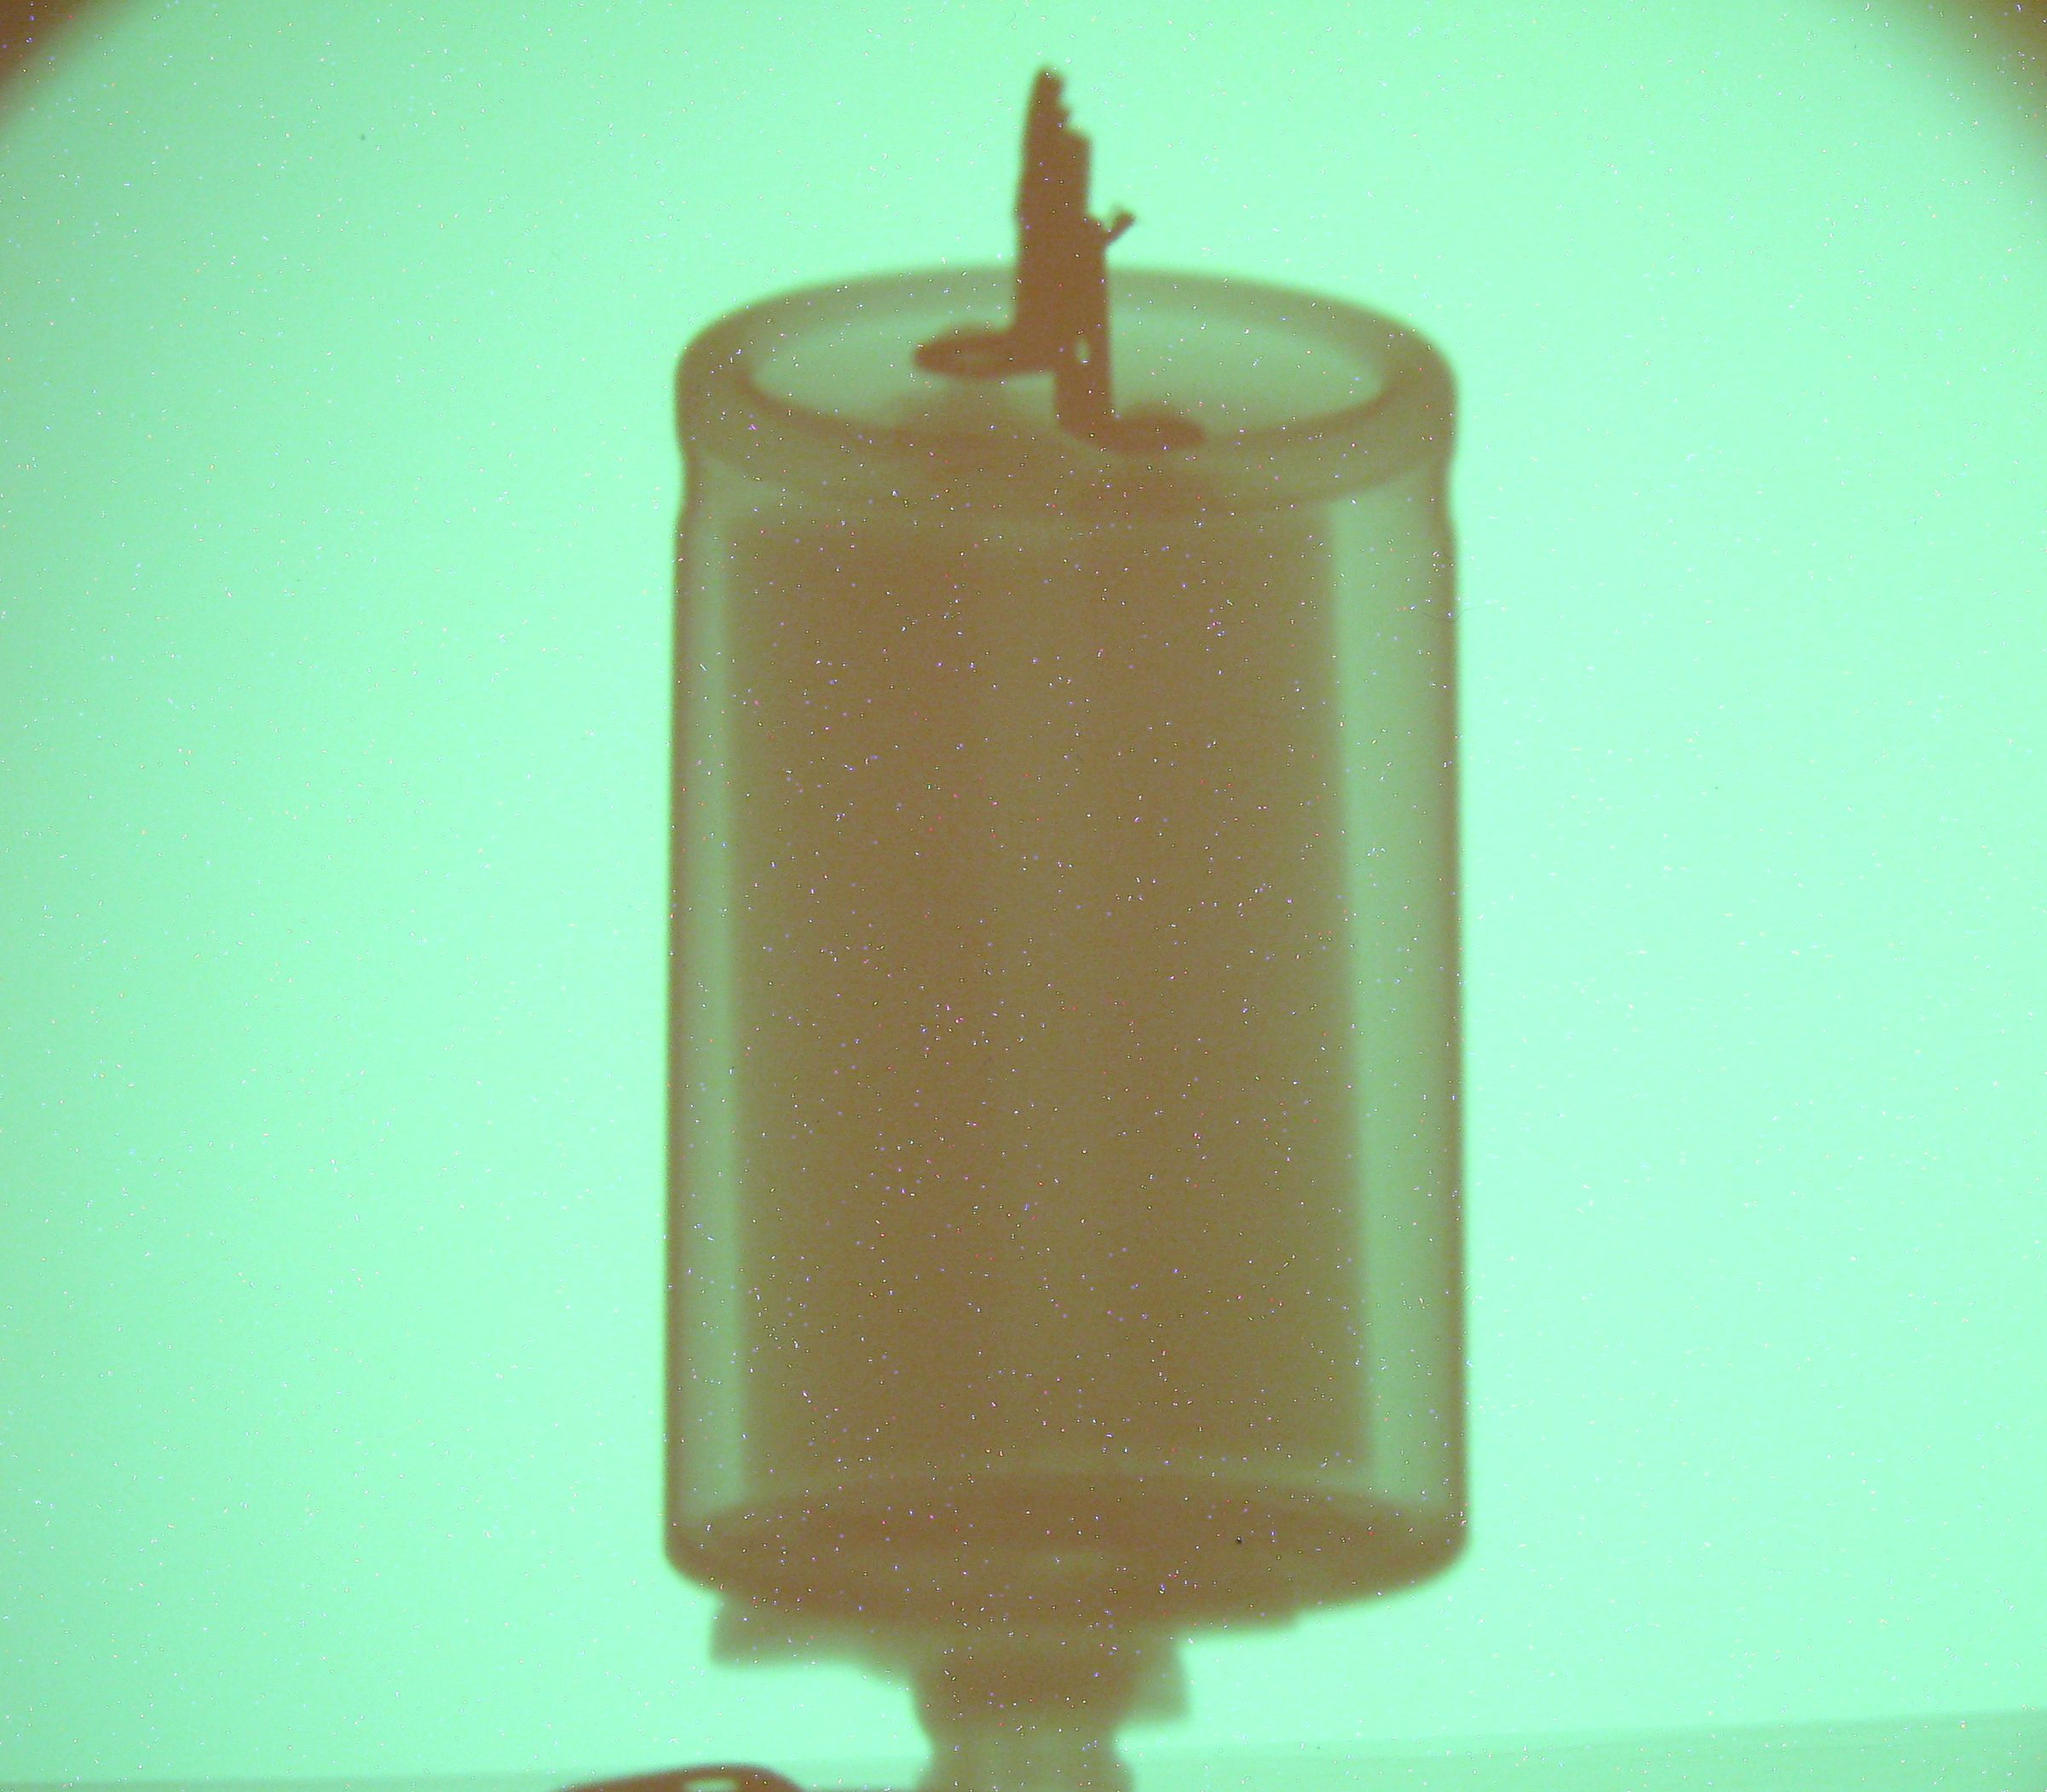
 X-ray test subjects, that hand has been involved too
Because I lacked a proper mains x-ray transformer, there was no need for oil cooling, so it all saved space. And my trusty triac regulator had again fulfilled its role of a heater filament supply. Again, check the Chirana article if you don’t have a clue how it was like.
Beryllium, a well-known carcinogen, has a lower X-ray attenuation coefficient than glass. That means, unlike my Chirana setup, the main X-ray beam here is not filtered and even the lowest energy X-rays pass easily through. Such rays are easily shielded out (and absorbed in live tissue, too), so it’s a nice setup for biological irradiation and study…
Another advantage of the window is a possibility of having lower input voltages to produce radiographs of thin/non-metal specimen. However, most Be-windowed X-ray tubes I have read about had a too large focal point size (awful for X-ray imaging), this tube had under two millimeters squared if I remember correctly, which is a huge plus and gives sharp pictures from a reasonable tube-object-screen distance.
Enough talk, now for some X-rays!


All of the above photos were taken with a 1 second exposure, compared to the 3-second Chirana setup. Here, the live X-ray image appears directly with full brightness on the intensifying screen, like a fluoroscope, indicating very high intensity levels – over approx. 50 rads per second from a close proximity. Tube kilovoltage – voltage drop through the overall current draw – is tuned with filament current through the triac regulator. (I’d be unpleasantly surprised if that twin-flyback ZVS driver still wasn’t enough to make a real time fluoroscope, but luckily as you can see this was clearly not the case 🙂 )
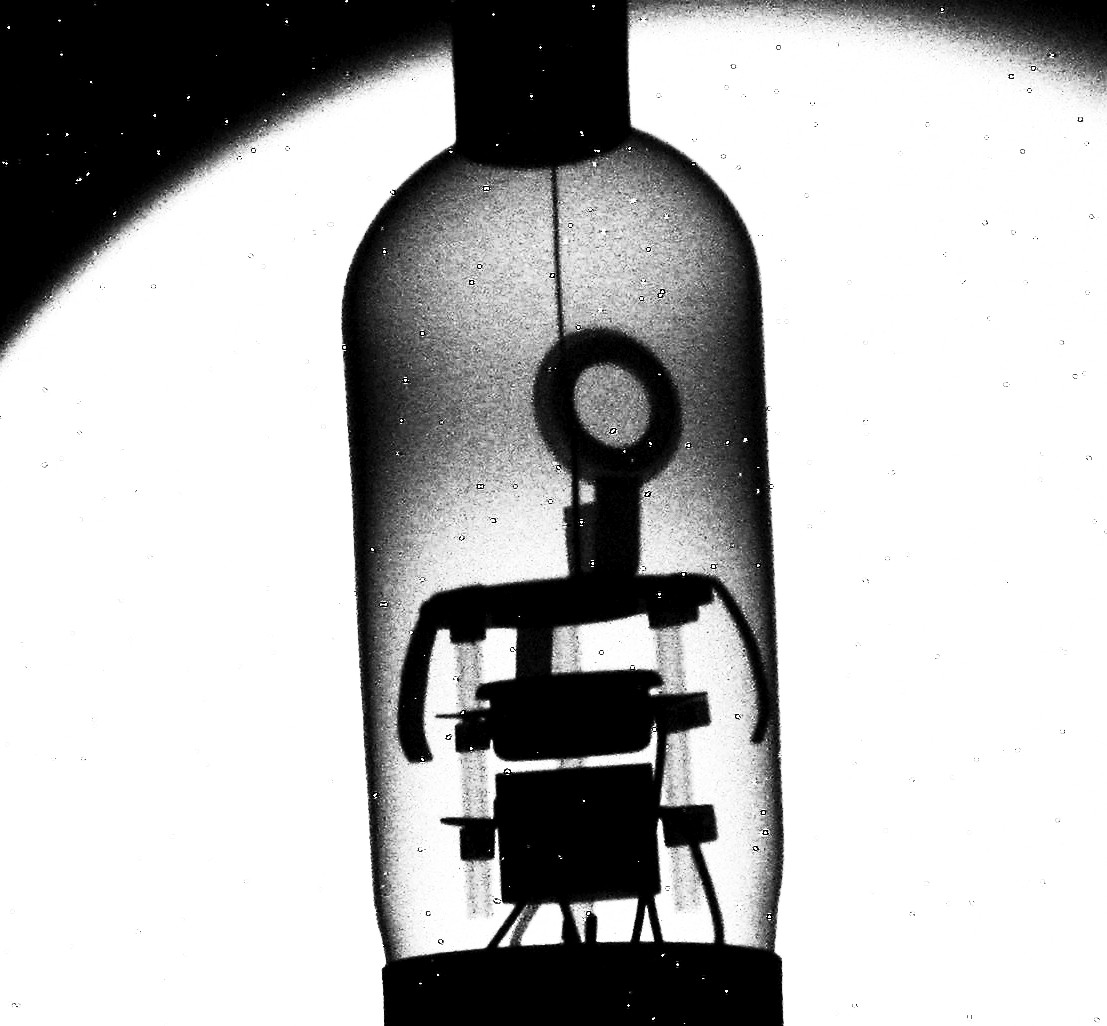
Using slightly higher input voltage (60 kV), longer exposure time of 5 seconds and somewhat decreased filament current, bigger metallic objects can be radiographed, such as this huge aluminum 5000uF 50V capacitor from early 1980s:
Now, for radiation intensity measurements… As mentioned previously in the Chirana article, classic Geiger counters are very insensitive to soft X-rays, and will show readings 10 to 10 000 times lower than they actually are. Such low-energy rays are thus dangerous and might be seriously under-estimated, that’s why I use the RadPro calculator to get an empirical data estimate.
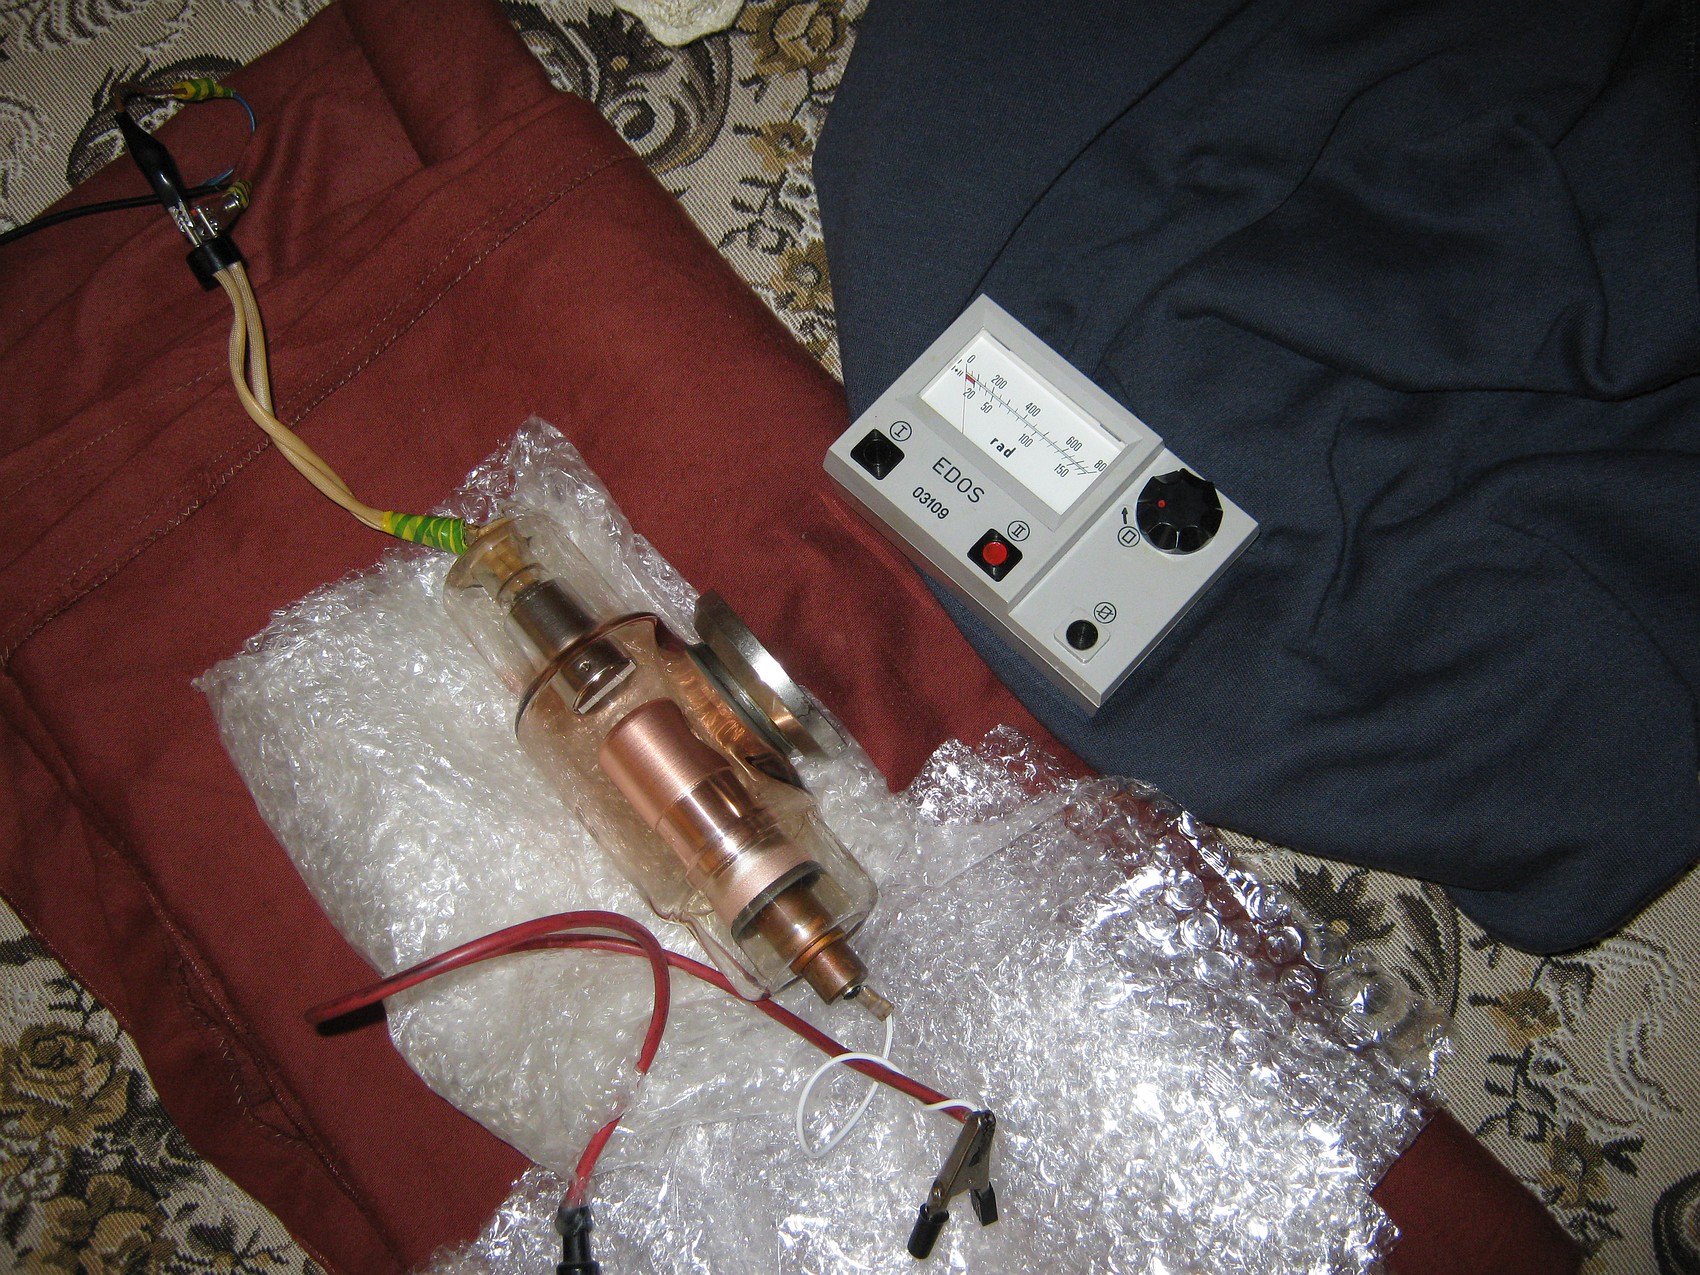 Measuring dose rate equivalent with “EDOS”
 … and X-raying it afterwards.
Nevertheless, I’ve tried to measure radiation intensity from a distance of 30 cm with my two measuring devices, the Soviet Geiger-counter based DP-5B and the Czechoslovak Geiger counter/ionisation chamber-based meter IT-65 (calibrated in 2006). With the IT-65 I had to remove the internal lead shielding plate to get the ionisation chamber ready for soft X-rays measurements; the rays still have to pass through the plastic case of the meter though, so some attenuation is present.
The results? At such distance, RadPro gave a result of 11900 R/h, or 119 Sv/h. How did the meters perform? See for yourself 🙂
Hi, there is something totally don’t get :
How does microfocus work ??? I read articles about modern tubes but it doesn’t seem to apply to this one …
Is there a coil in the cathode assembly ?
Hi Jozef,
nice project indeed. I’m planning to do nearly the same . One suggestion for photographing not moving objects is the use of 45° first surface mirror to avoid the “snow” and averaging a few pics.
Do you use background correction in your pics?
I’ve two calibrated rate meter starting at 40 and 60 keV respectively. That means, most of the photons are not detected and the actual dose rate could be much higher than displayed!
Best regards Michael
p.s. let’s keep in contact via E-Mail please
Hi! Do you know that an unshielded x-ray tube coul be fatal in less than an hour!? A mammographic x-ray tube, even in less time!!! Even you are not on the beam direction, you are exposing yourself to direct an indirect (scattering) radiation!!!! From your videos I can see that you are using unshielded x-ray: beware!!! because other people could decide to emulate you in this fatal game!!!
You did read the Disclaimer as you were instructed on the homepage to do so, or didn’t you? Those with enough know-how to build themselves a high voltage driver and gather a functional X-ray tube, should have enough common sense to click the link at least, besides understanding the warnings involved.
After all you’d be sniffing plants’ roots on the place of your burial if that thing shone on you for a certain amount of time, let alone that “less than an hour” time-interval you’ve just mentioned. You’re welcome to go moralize somewhere else. And please spare yourself of your overuse of the exclamation mark key..
Hi,
i made also a x-ray detector for imaging using a Lanex Fine screen and a canon camera if some working on same we can share the information so please send me your email address.
Regards
Hi, you are welcome to contact me using the upper “CONTACT” menu. You’ll find it there
Hello Γεώργιος,
I find this incredibly fascinating. Can you tell me more about what you are doing? I have read a little about the carbon nanotube x-ray sources, but I am unfamiliar with using the scotch tape method to generate x rays. What is that all about?
Thank you, and great article Jozef!
Justen
Hi, I’m not quite sure, but there’s some evidence that unrolling a reel of tape under vacuum provides some soft x-rays, it has something to do with the triboluminescent effect.
I have a Torrex 150D in excellant condition with original manual & accessories.I am looking to sell it and move from its current space.If you are interested I have pictures and video of if in operation.
sftosto@gmail.com
Very very nice! I am very happy to read your article, because i was more or less doing the same. But back then i had no proper radiation monitoring device (ion chamber) so i stopped the experiments at the level of a 2X2 on a 120cm-spark coil (later measured 1-2R/h). I have scrapped an old TV tube and got only the front screen glass by removing the rest with a hammer- this is, as we know, lead glass. Now we can place a flourescet screen behind the TV-screen and biult the x-ray tube with shielding behing, and watch x-rayed objects in real-time! If the lead glass of the TV stops x-rays sufficently at 50..60keV will have to be testet. Also, i have had something in mind like the idea with two flybacks in series, im very happy to see it realised here!
Greetings from Germany
Glad you like my setup, play safe und Viel Gruss!
As for the 2X2 I have indeed seen some experiments on 4hv.org with it, running cold cathode or so and yet providing better results than, say, the DY86 experiments of mine. Also even some old Russian rectifier tubes found inside their old color televisions, GP-5 or so (in Cyrillic) have had an x-ray warning sign on them. Those might be also good for the start.
Best regards.
Hi there.
Very cool project.
I want to caution you though (I saw the trumpet video..), TAKE UTMOST CARE TO PROTECT YOURSELF AND PEOPLE/PETS AROUND YOU.
Use plubium blankets.
Just as a reference, here is a link to a page that describes Edison’s assistant, which experimented with xrays — http://en.wikipedia.org/wiki/Clarence_Madison_Dally
Good luck.
Siggi,
I possess the proper (and calibrated) ion chamber based radiometric equipment plus I always make sure there’s nothing alive standing in the trajectory of the X-ray beam, whether main or scattered. And what happened to edison’s sidekick doesn’t interest me at all – it was his own fault since X-rays were not understood back then.
“Use plubium blankets.” Plubium..? If you meant lead, well, there’s no need for lead at all. The answer lies within the properties of X-rays this machine generates – 40 to 50 keV. You should read on a bit how they are easily adsorbed and easily shielded off.
Best regards.
Jozef,
Good to know that you possess the proper equipment.
As for “plubium” blankets, I meant Lead (latin – Plubum) blankets. The reason I mentioned this is because I believed that you had the fluro trumpet video on YouTube. Perhaps that was not shot with your equipment.
As Mathias mentions, be careful with X-Rays – no matter how easily they are adsorbed.
Cheers,
Siggi.
Hi Jozef,
I saw your article featured in hackaday. I must say i am impressed with your diy project !
I work for a company that develops x-ray machines, and we use this technique in one of our devices.
After reading your project, i have to say you are producing a lot of xrays for the output you need.
The scintillator screen you are using is not one of the most sensitive out there, and pretty old. If you could get your hands on an (still older) ORTHO FAST screen, you would get double the light output for the same level of x-rays. If you could get your hands on a (newer) SPEED 800 (made by different manufacturers) you could get tripple the output !
In order to eliminate the noise you are seeing in your image (xrays hitting the ccd, and permanently damaging it), you should try to pass thru a 45° mirror.
I also notticed that you have no protection around the tube… For safety reasons you could construct a lead housing for the tube, that only has an opening where your primary xrays come out (the aluminum shield on the tube) because an xray tube produces xrays in all direction ! (about 90% will go in the direction you want, the rest flies everywhere else).
I hope this info can help you 🙂
Best regards,
Guy
Hey Guy Verachtert and thanks for your comment!
Most of the RAPID screens (with a speed of 800) I have seen were in blue-emitting color, and my camera tends to be more sensitive to green than to blue – while photographing my blue laser experiments, I had to increase contrast and brightness to the appropriate levels. Actually, in the previous “Chirana” article, I have used such a screen, “DuPont Quanta 800”.
As for radiation protection, well, 40-50 keV X-rays hardly pass through any denser objects such as metal or concrete. While performing the experiments, I usually stand behind three wardrobes or behind a concrete wall – 180° away from the tube – with just 5 mR/h reported intensity. And since I’m not using a proper x-ray transformer, but two television transformers to drive the tube ( 😀 ), the maximum I can do is, to run the tube in 5 second intervals, but 2 is enough.
I use some ion-chamber-based radiometric equipment, calibrated in 2006 – the IT-65, in the Vintage section.
Best regards
Be carefull with this my friend…x rays are very dangerous.
great impromptu setup… have you thought of using leaded glass shield in the front of the sensor of the CCD camera? I am currently setting some experiments as well on this type of device. I am in the process of making a xray generator using friction cohesive force imparted in a vacuum setup much like the use of scotch taping unrolling etc. This is in hopes to approach a more lowered voltage application using carbon nanostructures to enhance the low level production on a consistent application.