Earlier this year I’ve got a cheap old Amiga 500 for tinkering purposes. Now, I never really had any Commodore paraphernalia around here, and my first PC was a 486 to play games on, but – some of my DOS favorites were actually ported from an Amiga, so I have decided to give this one a try…
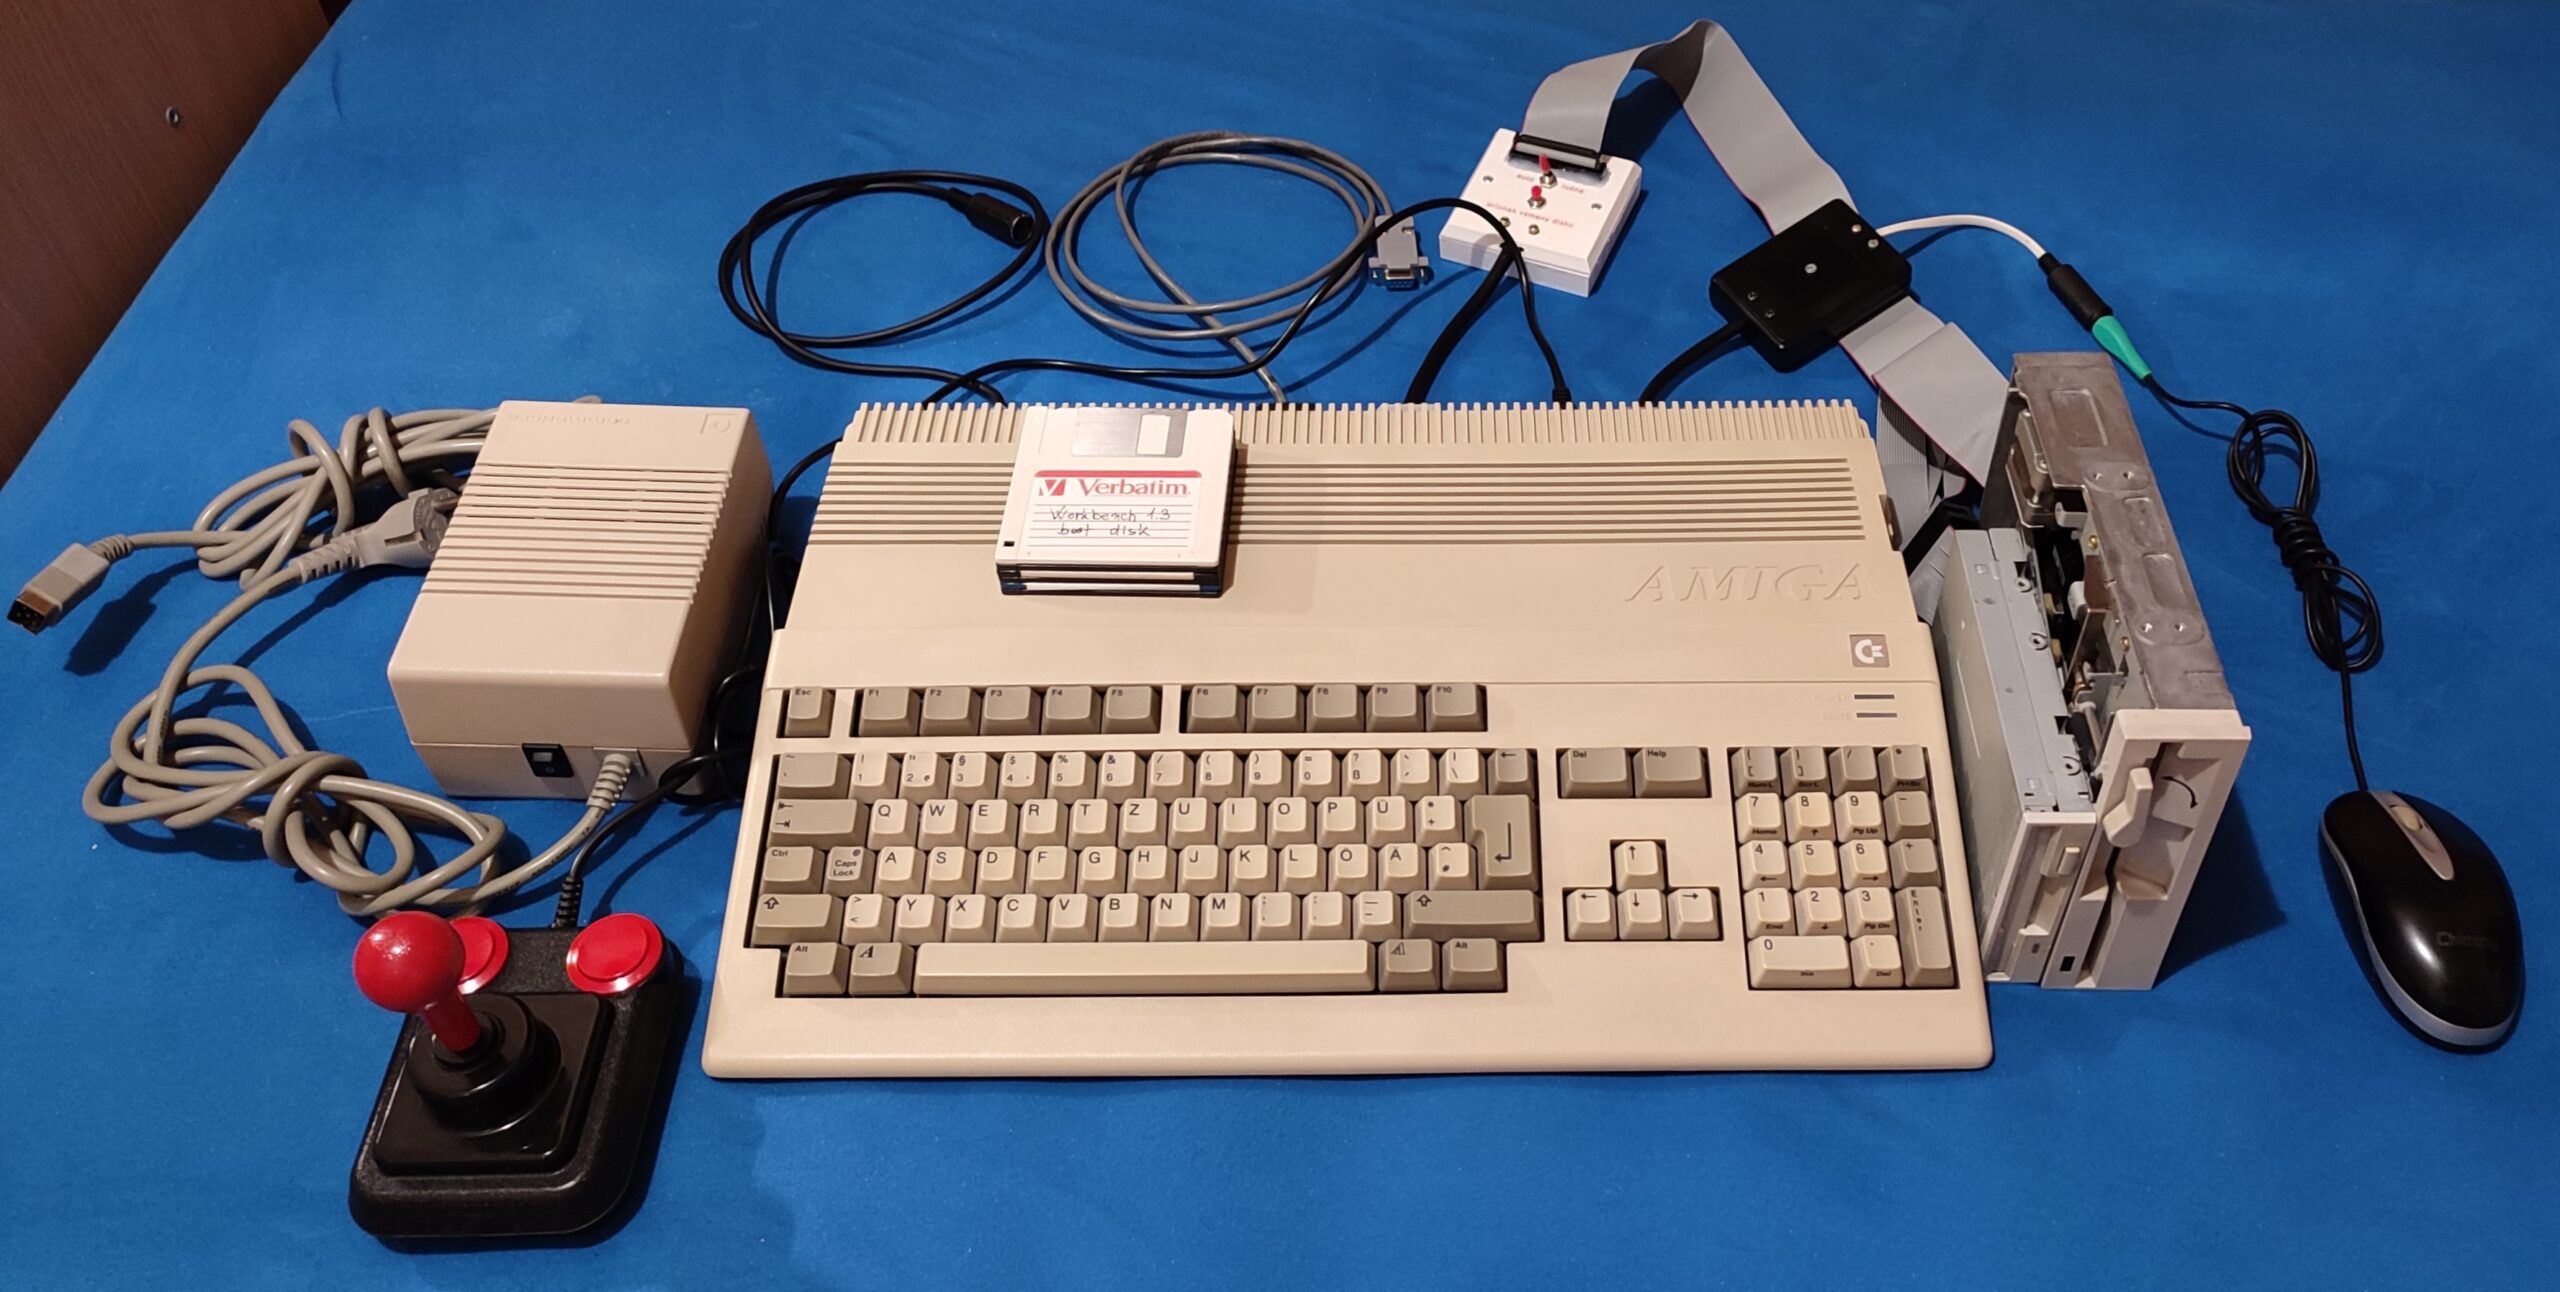 The Rev6 A500 (ECS), with some “homebrew” accessories
As part of the auction I only got the computer itself and the power supply – with no screws inside, it disassembled loose along the way, being lucky the heavy transformer didn’t smash the brittle yellowed ABS case. It was cheap as it didn’t turn on properly all of the time – this was traced to the Kickstart socket not having a good connection with the ROM, so that had to be replaced. Also, someone tried to mount a small cooling fan onto the top cover, breaking some of the internal grille while at it… Other than that, thankfully, the rest of the machine was fine – the custom MOS chipset can command quite a value nowadays.
Upon powerup, it was determined the Amiga was most likely used with an accelerator card or a hard drive expansion, as the ROM was of version 3.2 for Kickstart 47.102. Since this A500 only has one floppy drive, and an AmigaOS 3.2.1 requires more than that, I’ve flashed the ROM back to Kickstart 1.3 to run Workbench:
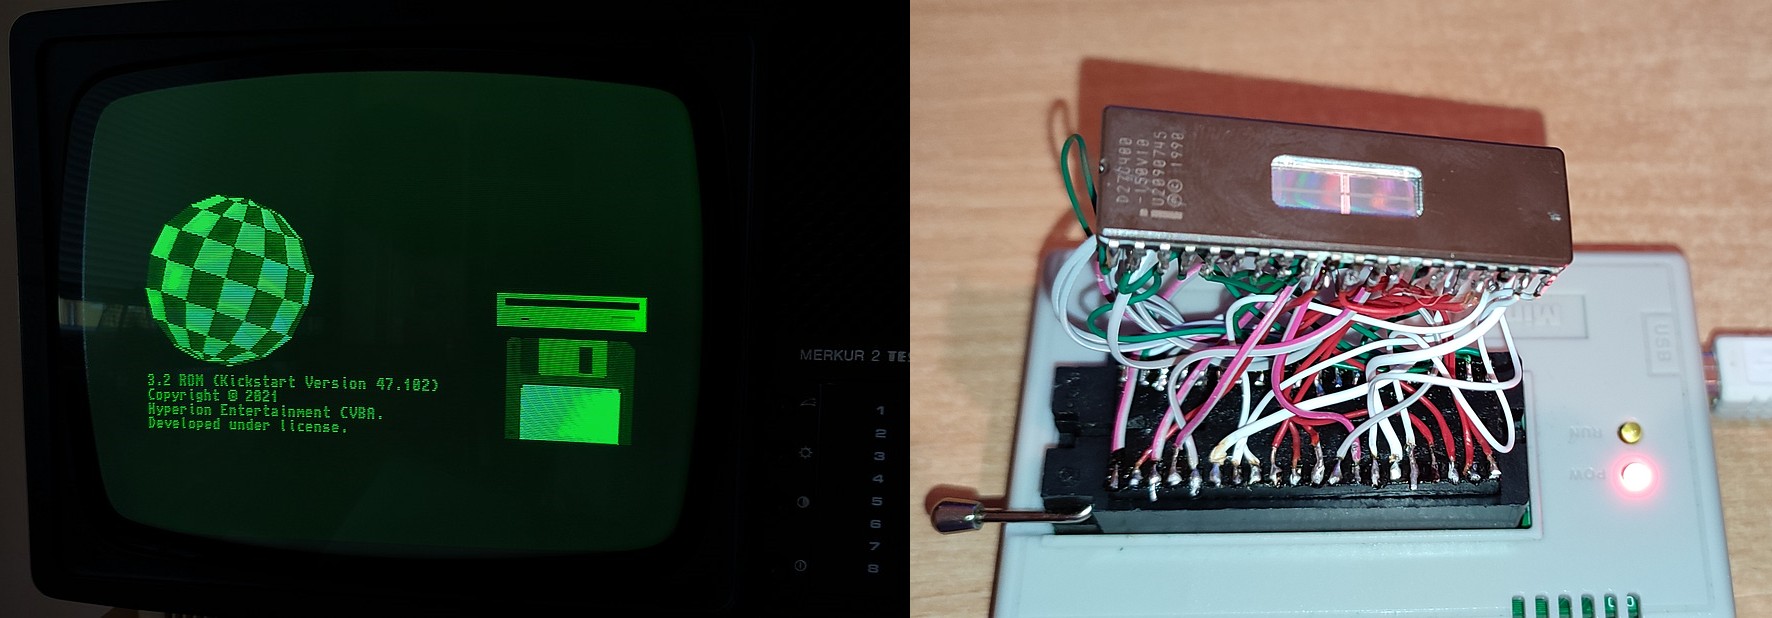 27C400 jerry-rigged as a 27C4096 to program inside the TL866 “MiniPro”
Before programming, I needed to make a quick adapter to the MiniPro flasher as it would not work directly with a 27C400. I soldered on the legs of the ROM as they were black and oxidised, and my parts drawer did not have a spare DIL40 socket – apart from the one I replaced on the Amiga mainboard – and the adapter was to be used only once, to get the classic 1.3 Workbench running. After flashing, I’ve cleaned the legs with a solder wick to make sure it fits in the new “precise” DIL socket without issues, the pins now having a fresh de-oxidised solder layer, making a good contact.
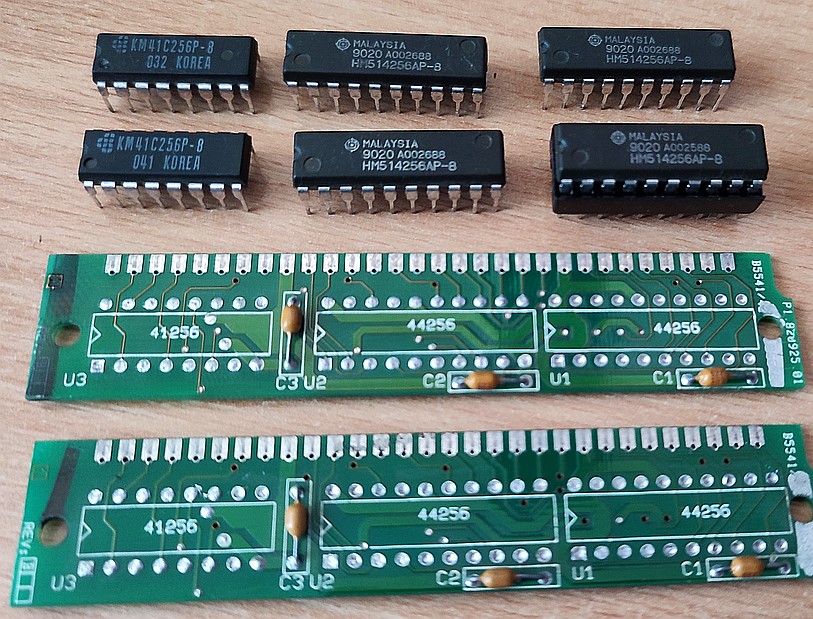 Desoldering 256Kx4 RAM off a 286 PC SIMM to fit the Amiga
The next mod was to update the stock 512K mainboard to one meg of RAM. For this I’ve utilized a pair of SIMM RAM modules I had around for a 286 system – four 44256 RAM chips will do. Of course custom/trapdoor expansions exist, but I wanted to reuse what I already had, instead of investing something to fit the old system. Before doing this I made sure to run CheckIt on the 286 PC to verify the RAM chips. Afterwards, they fit right in, so the last step was to configure JP2 to chip (“fast”) RAM and JP7A kept floating (trapdoor RAM expansion off).
One problem with this chipset is that it won’t address full 1 MB of RAM, i.e. 1024K. Running SysTest, the maximum addressable memory is shown to be 1018K, i.e. six kilobytes short (upper offset being 0xfe7ff), both on this physical Amiga and also on the WinUAE emulator – chipset issues ruled out. Now, some software that has been developed on “better equipped” systems such as the A1200, A500+ or A600, that can address full 1024K or more, will not work on this “improved” A500 that has “almost” 1MB of RAM. A nice example of this is the Fairlight cracked version of Worms, that will crash on loading for this very reason. I’ve raised this issue in 2 separate threads, here and here, if interested.
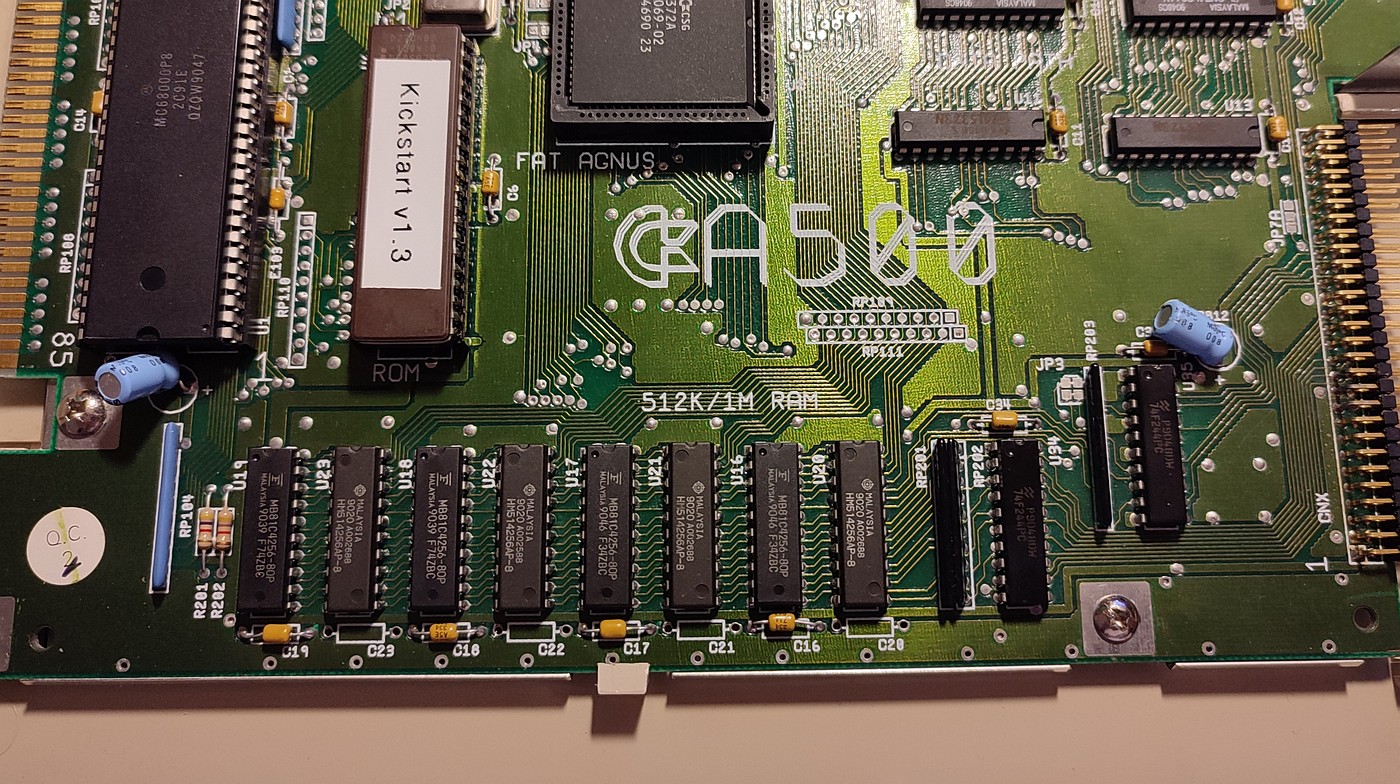 RAM chips populated, Kickstart 1.3 is in.
I’ll make sure to solder in the remaining 100n ceramic caps… someday.
So how to get some software in? Well, there are floppy disk images to be found, but I kept the stock 3.5″ DD physical drive, instead of buying an emulator. The only problem is that Amiga disks won’t read in an old PC floppy disk drive directly, as any NEC uPD765-based floppy controller in a PC will not do 880K in DD (250kbps) mode. This would involve programming the inter-sector gaps to zero, which the PC FDC chip won’t do – not even with my MegaFDC.
What I found to work the best was to craft a null-modem serial cable (for other purposes too), the Amiga uses the oldschool DB25 interface. I had this connected to a USB-serial dongle, and used the AmigaXfer Windows software to do ADF disk transfers, read and write, with verify. This establishes connection with the ROM debugger RomWack of the Amiga, however there might be a small issue getting into the first time. What worked for me was to wait for the Amiga to display the “insert Workbench diskette” icon, then, having the serial connection ready, momentarily grounding pin 22 of the Motorola 68K to trigger a system crash. When done correctly, the ROM Debugger will attach, but if there’s no serial link established, it will proceed into the Guru Meditation error.
Now, once the debugger is present, a special “boot floppy” can be written to enter the system for AmigaXfer disk transfers, instead of this hardware hack. This disk is then to be present during boot.
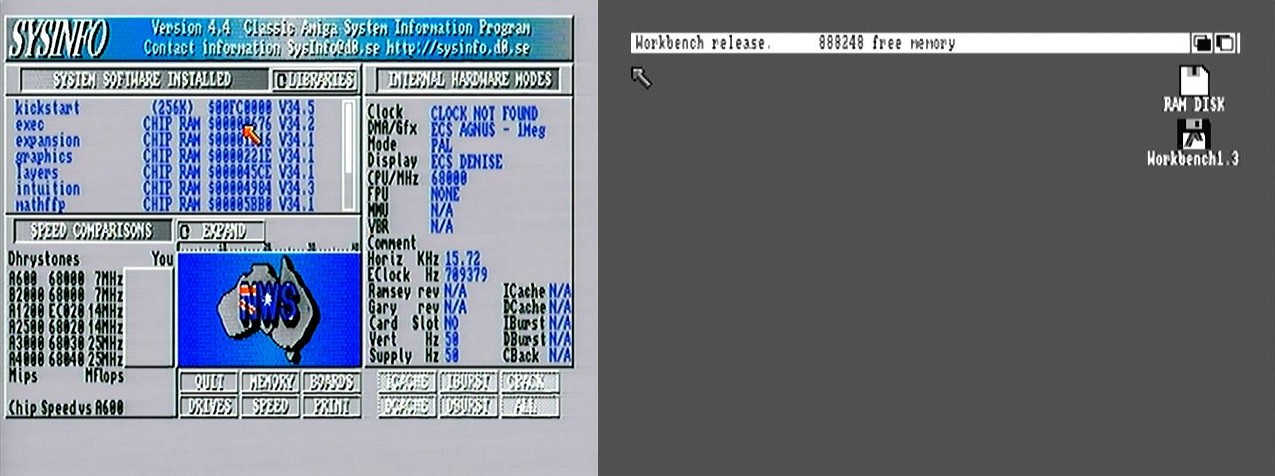 Running SysInfo (DB-23 analog RGB) and Workbench (monochrome RCA jack)
To get color video out of the Amiga, analog RGB and sync can be obtained from the, unfortunately non-standard, DB-23 connector. They sure had a field day designing this with custom connectors, for example the power input is a square DIN “domino” connector with pin pairs off-set, also a second DB-23 to connect external floppy disks…
Back to the video out: the DB-23 also contains TTL RGB video lines, but this has no practical purpose as it is limited to 16 colors only (logical RGB combined with intensity signal). I tried to supply this signal to feed a CGA monitor off the PCjr, but could not get it to sync as my A500 is the PAL version. Instead, I use the analog RGB lines to fit an upscaler, or an old multisync monitor could be perhaps used.
There’s also a video out RCA jack on the Amiga, but this only provides black and white…
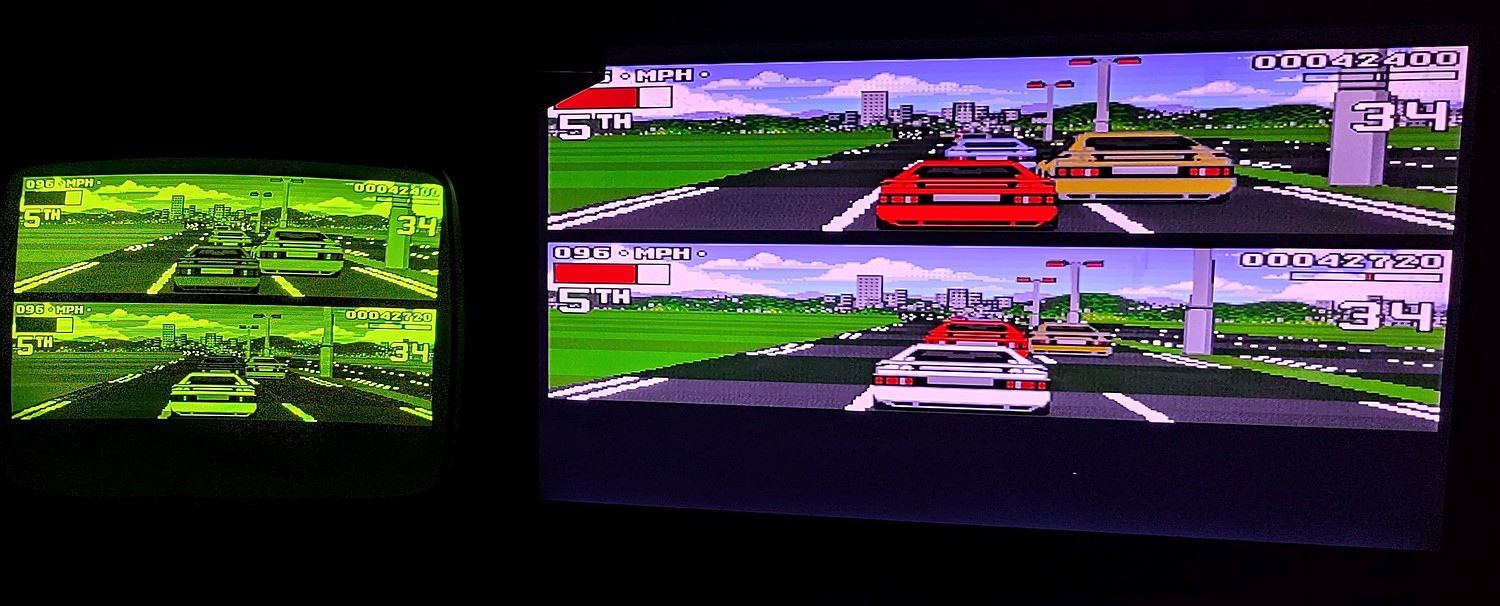 Lotus 2 on both monochrome and color
When I booted up on Workbench I found out that it isn’t usable without a mouse, unlike, say old versions of Windows. The 2-button Amiga Mouse was a common occurence back then, however, my machine came without one – so I made an Arduino Nano based converter, to work with a PC PS/2 mouse. It might not look very “original”, but at least optical mice can be used, avoiding hassle with the ball mechanism 🙂
Also one of my favorite games, the Lotus, automatically assigns a joystick to the first player, and unlike the DOS port, it only allows keyboard control to the second player. Before I fixed up a joystick, a Competition Pro I originally got to work with a Slovak ZX Spectrum clone (and also to the PCjr with its own “game port”), I launched a two player game, with the first car stationary and the second one controlled from a keyboard.
A piece of rubber in the vintage Competition Pro has hardened, so the joystick turned rather into a misery-stick. I gave it a glycerin and oil bath in an attempt to restore its flexibility, that didn’t do much. So I cut out a piece of thick felt I used to make wads for a shotgun muzzleloader, and made a hole in the middle. That worked like a charm and will not harden any more. 🙂
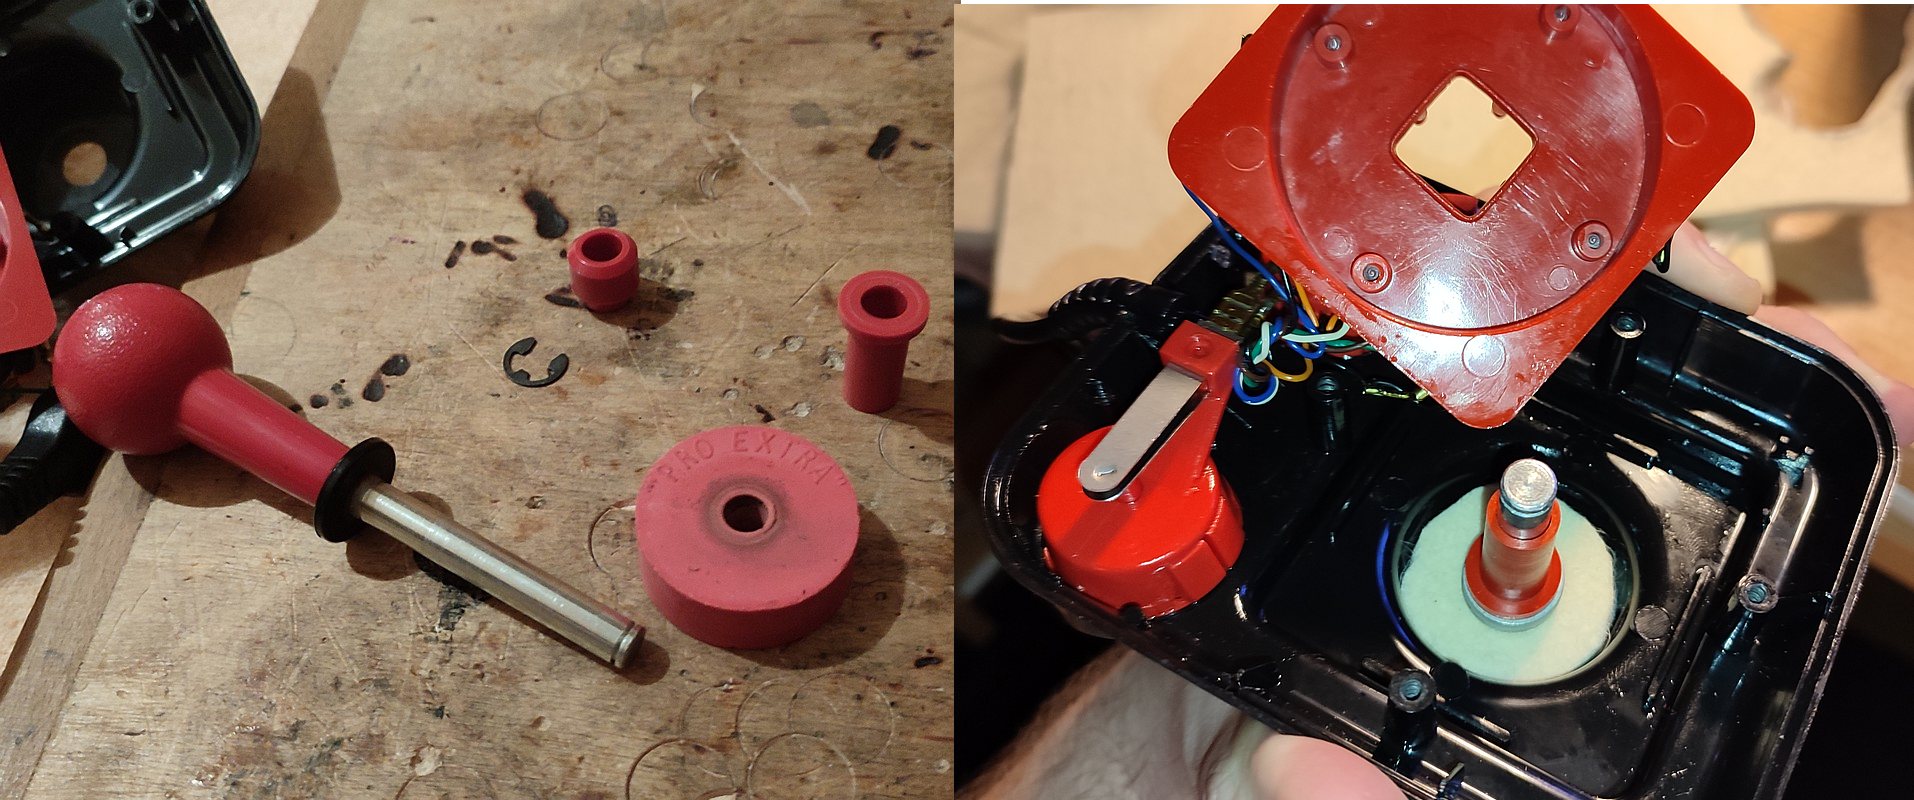 Replacing the rubber center piece with felt in the Competition Pro joystick
As mentioned earlier, I kept the Amiga more-or-less stock, without any “accelerator” cards. Even though I like blending old technology with the new, I consider this trend to be like installing a Raspberry Pi into an IBM PC,… so, why not just use a software emulator in a modern machine in the first place, where it can be tweaked to use custom clock speeds, RAM sizes, accessories and whatnot. But to each his own, I guess. 🙂
However, the single internal floppy drive was found to be quite limiting in the old hardware. Similar to the PC mouse converter mentioned above, I grabbed a second Arduino Nano from my “parts drawer” and made a second adapter to fit 2 extra floppy drives to the Amiga. For period correctness, if required, it can be done using discrete TTL logic: connection of regular 3.5″ PC floppy drives is made possible by demultiplexing the MTRX line of the Amiga to separate “motor enable” lines, simulation of the READY line and the DISKCHANGE lines via a switch – for drives that do not have this signal.
Originally this switch was also used to signal the presence of a 5.25″ DD drive from a PC, which doesn’t have any READY or DISKCHANGE signals that the Amiga requires, while simulating the proper drive type ID using Amiga’s READY line. Since I have found more compatibility problems with 360K PC drives on the Amiga, I have commented out this detection behavior – it can be re-enabled in code, if wished:
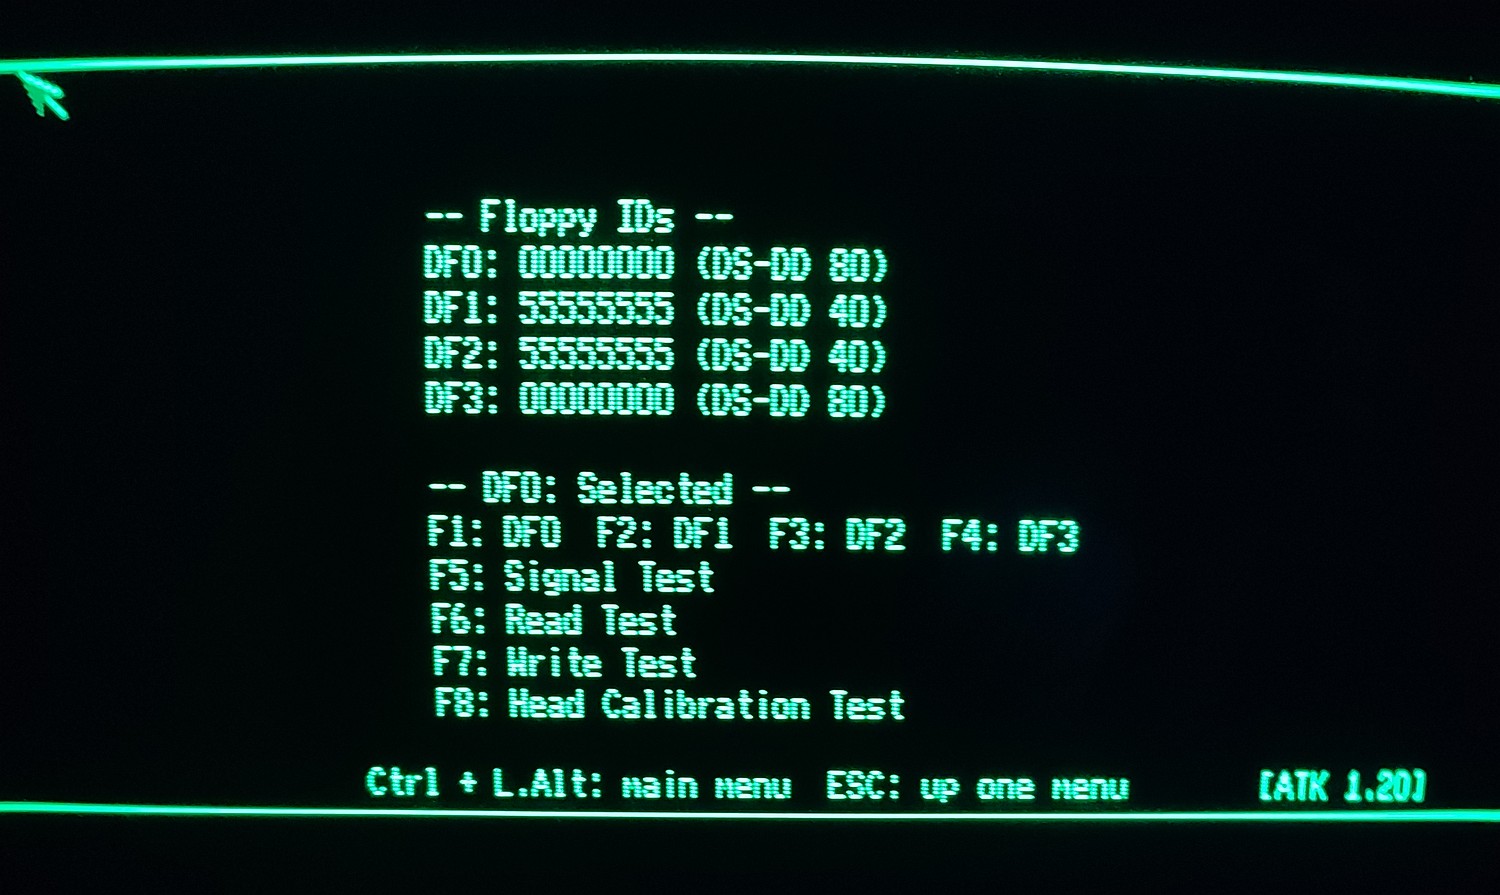 2 external floppy drives identified as 5.25″ double-density in the adapter
Running AmigaTestKit 1.20