
Description: A semi-professional 2-track tape recorder.
Manufacturer: Willi Studer GmbH
Made in year(s): 1977-1997
Country of origin: Germany/Switzerland
Status: Working, in good condition
The Revox B77 were a series of semi-professional (or “professional home audio”) reel-to-reel tape recorders, manufactured by Studer in Switzerland, and later (West) Germany. These were in-production for nearly 2 decades, starting in the late 1970s, with the last recorders coming off the assembly line in December 1997, which is quite remarkable.
Spinning away
Being a very expensive piece of home audio equipment of the yesteryear, Willi Studer kept the ReVox brand for his range of semi-professional audio devices. Nevertheless, all the assemblies and parts inside sport the STUDER brand, i.e. the motors, heads, circuit boards, and the like.
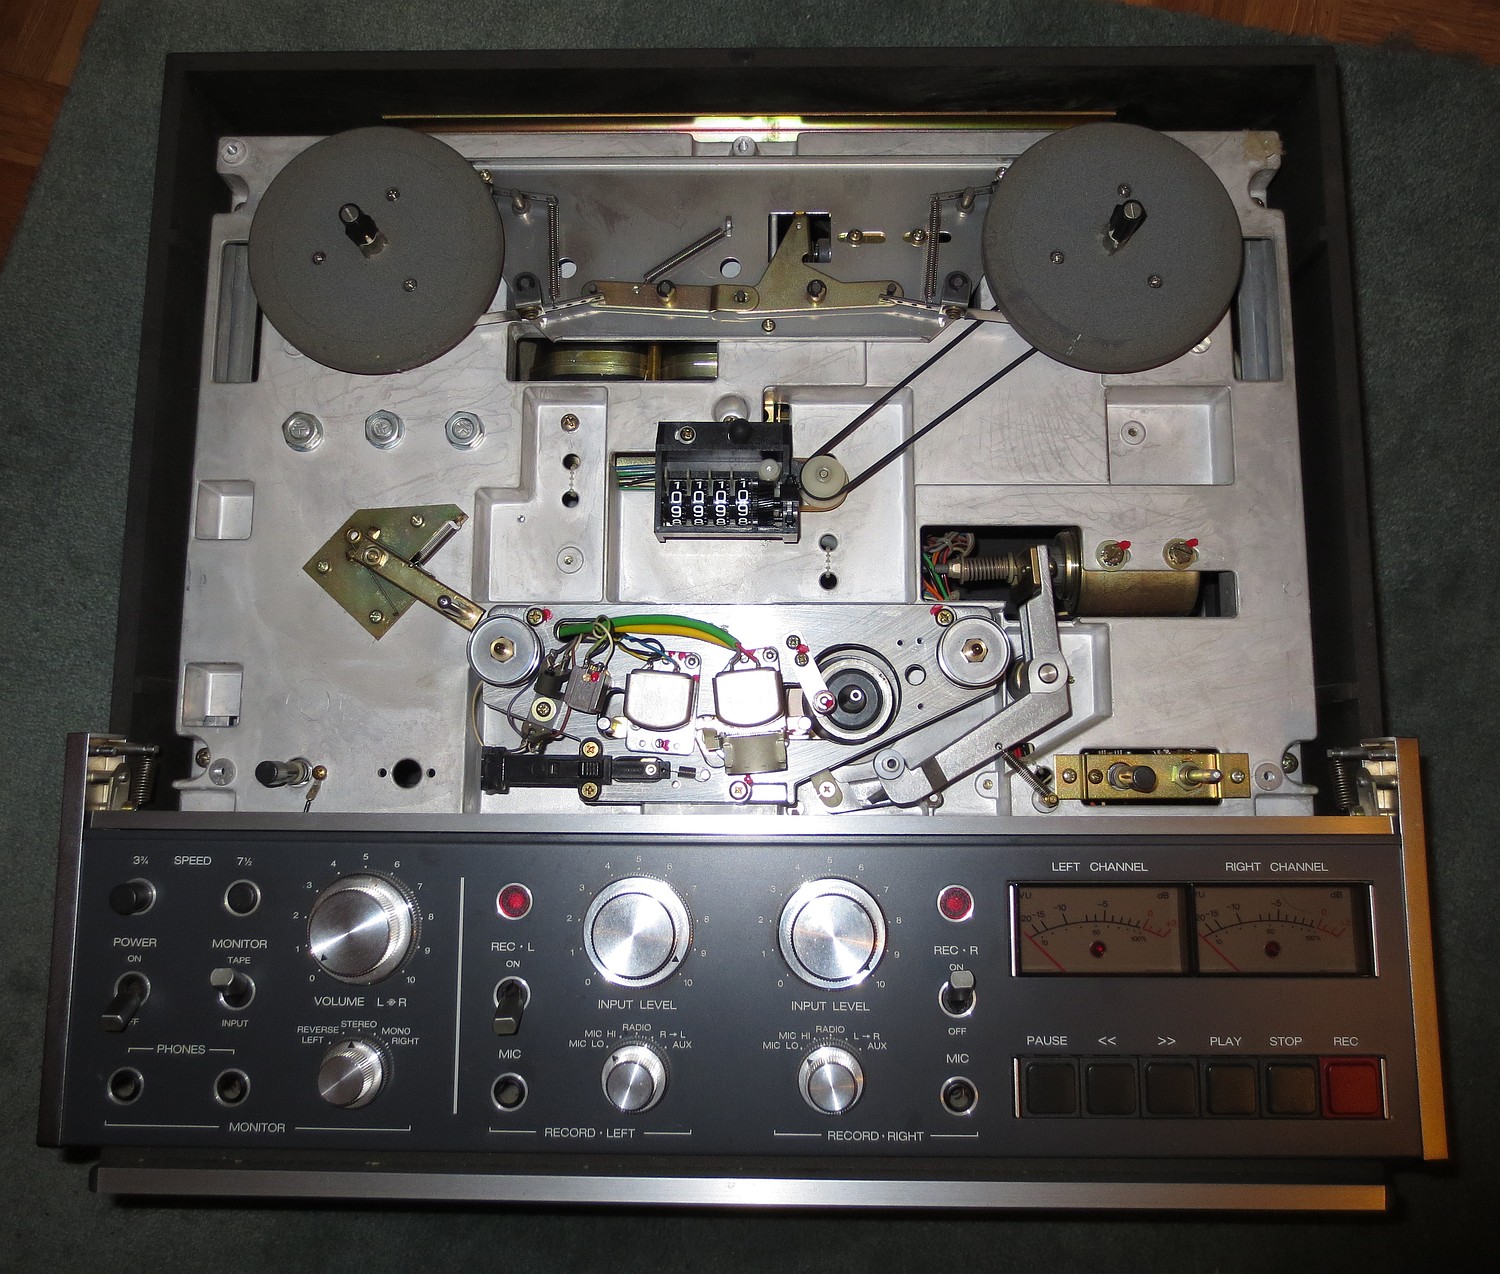 With the front panel down
The B77 series were the successor models of the relay-actuated Revox A77 predecessor series. Itself, the B77 was made in two main revisions, the “vanilla B77” retroactively named as the Mark One (MKI) variant, produced until 1980, and the improved MKII variant, whose production ended in December 1997. In sync with the B77, a more-professional variant of the B77 known as the Revox PR99, was fitted with balanced inputs and outputs, and – beginning with MkII – a digital tape counter, different tape tensioners and more sophisticated electronics.
Be it the B77 mark one or mark two, these machines came out of the factory with all sorts of modifications, as requested by the customer. You could opt-in for a 4-track or a 2-track variant, an equalization setup either according to the NAB (Ampex) or the IEC (CCIR) standards; have Dolby noise reduction or slide projector synchronizer electronics fitted in, an optional remote control (with an optional infrared receiver), or an RS-232 interface, and the sort.
There also were at least 4 different speed configurations: the vanilla B77 shipped together with a 2-speed option of 9,53 and 19cm/s (3 3/4 and 7 1/2 IPS, respectively). There also was the “high speed” HS variant (19 and 38cm/s), the low speed LS variant (4,76 and 9,53cm/s) and finally, the super low speed SLS variant (2,38 and 4,76cm/s), used for logging purposes, instead of recording music.
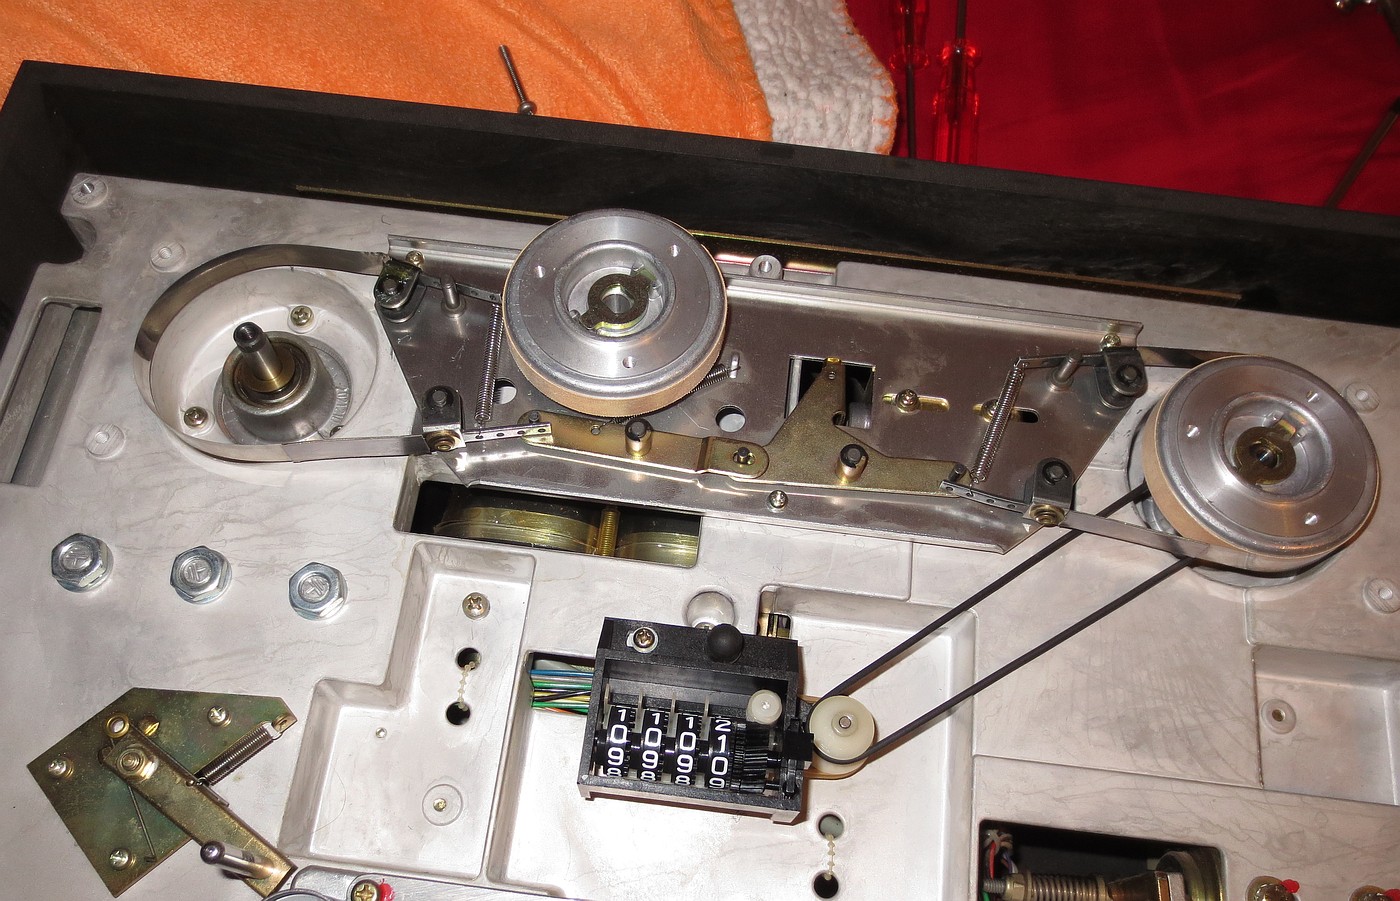
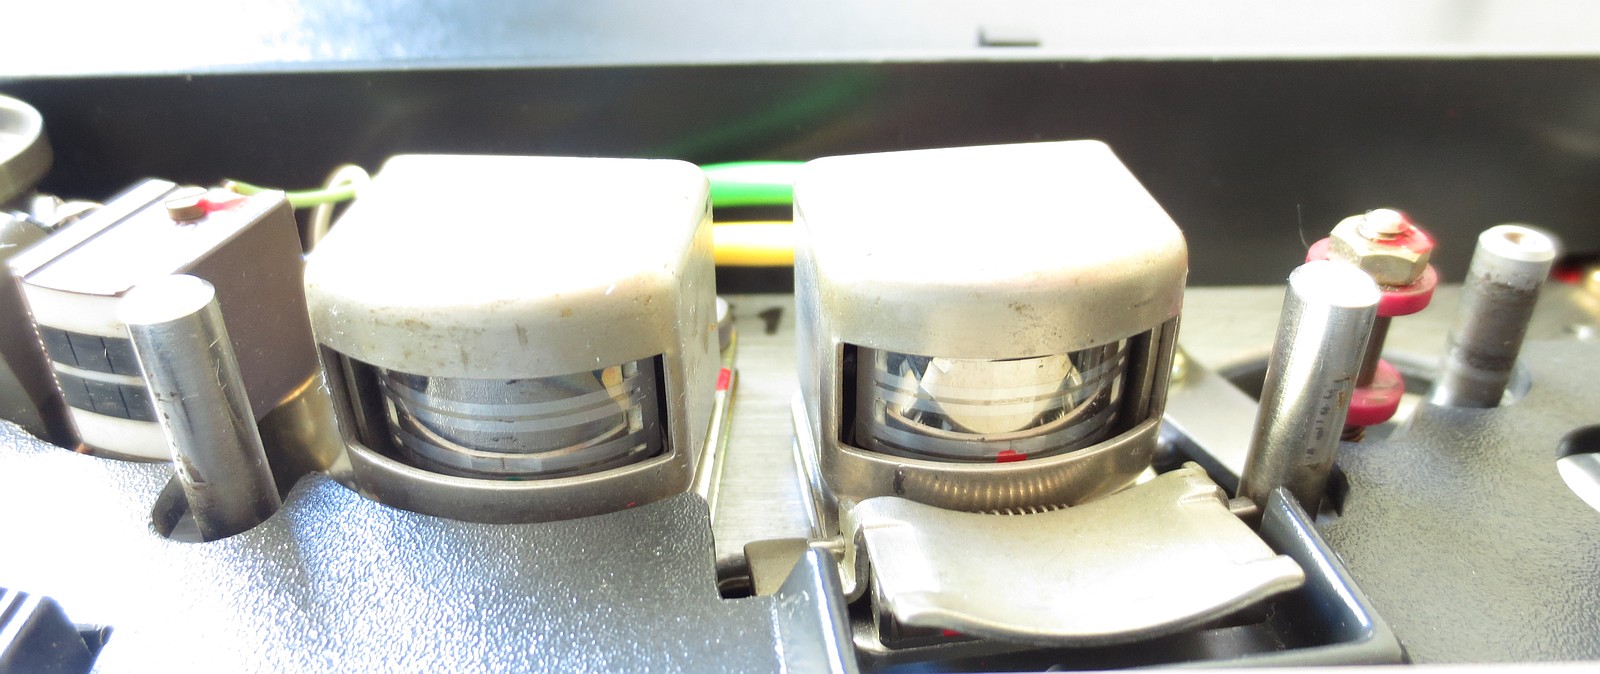 The tape transport
The exterior differences between the vanilla MKI and the improved MKII are slight, but noticeable: the Cueing button keeps the tape playback head clamp open (for easier marking), and the MKII also includes an internal varispeed circuit: for the MKI, you’d need the external Revox accessory to tweak the speed from the two nominals.
The internal differences are mainly, but not exclusively, on the digital tape drive circuit boards: the MKI variant uses a mask-programmed gate array, the Motorola “SC10429”, whereas all MKII variants use 74xx-based TTL logic coupled with an action bitmap stored in a 32-byte, one-time PROM, to actuate the TRIACs and brake relays of the tape transport.
Also, the latter MKI variants can be fitted with a “substitution board”, containing the bitmap in a PROM, instead of the PGA.
The rest of the differences between the circuits are mostly on the capstan drive and the preamplifier boards.
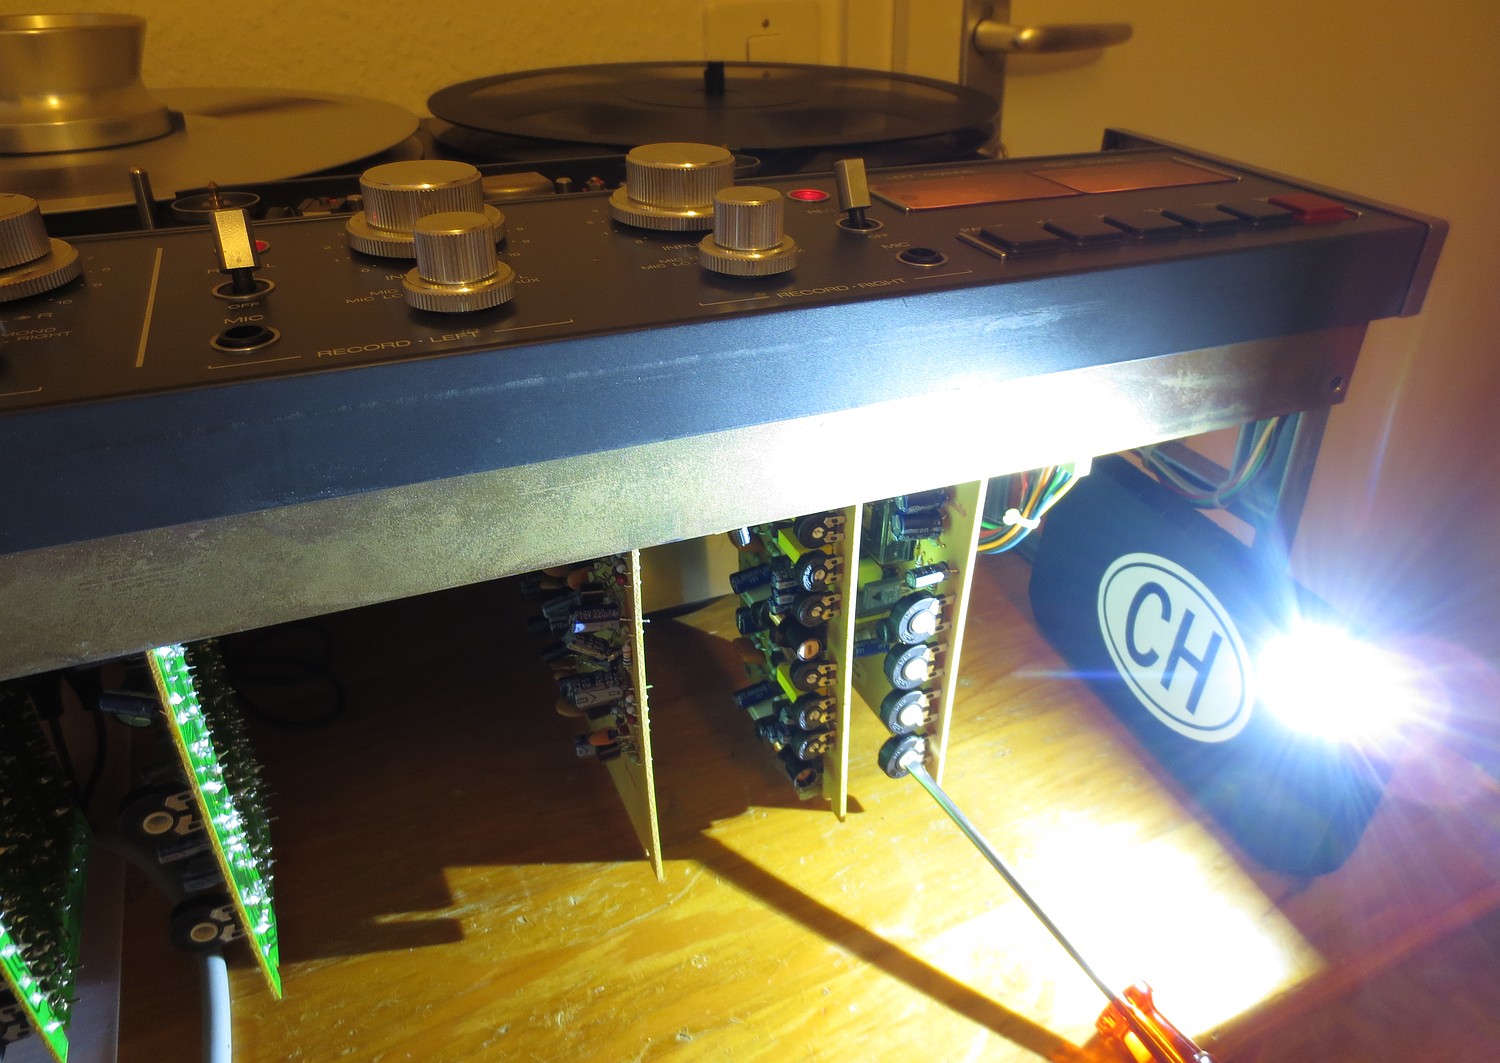
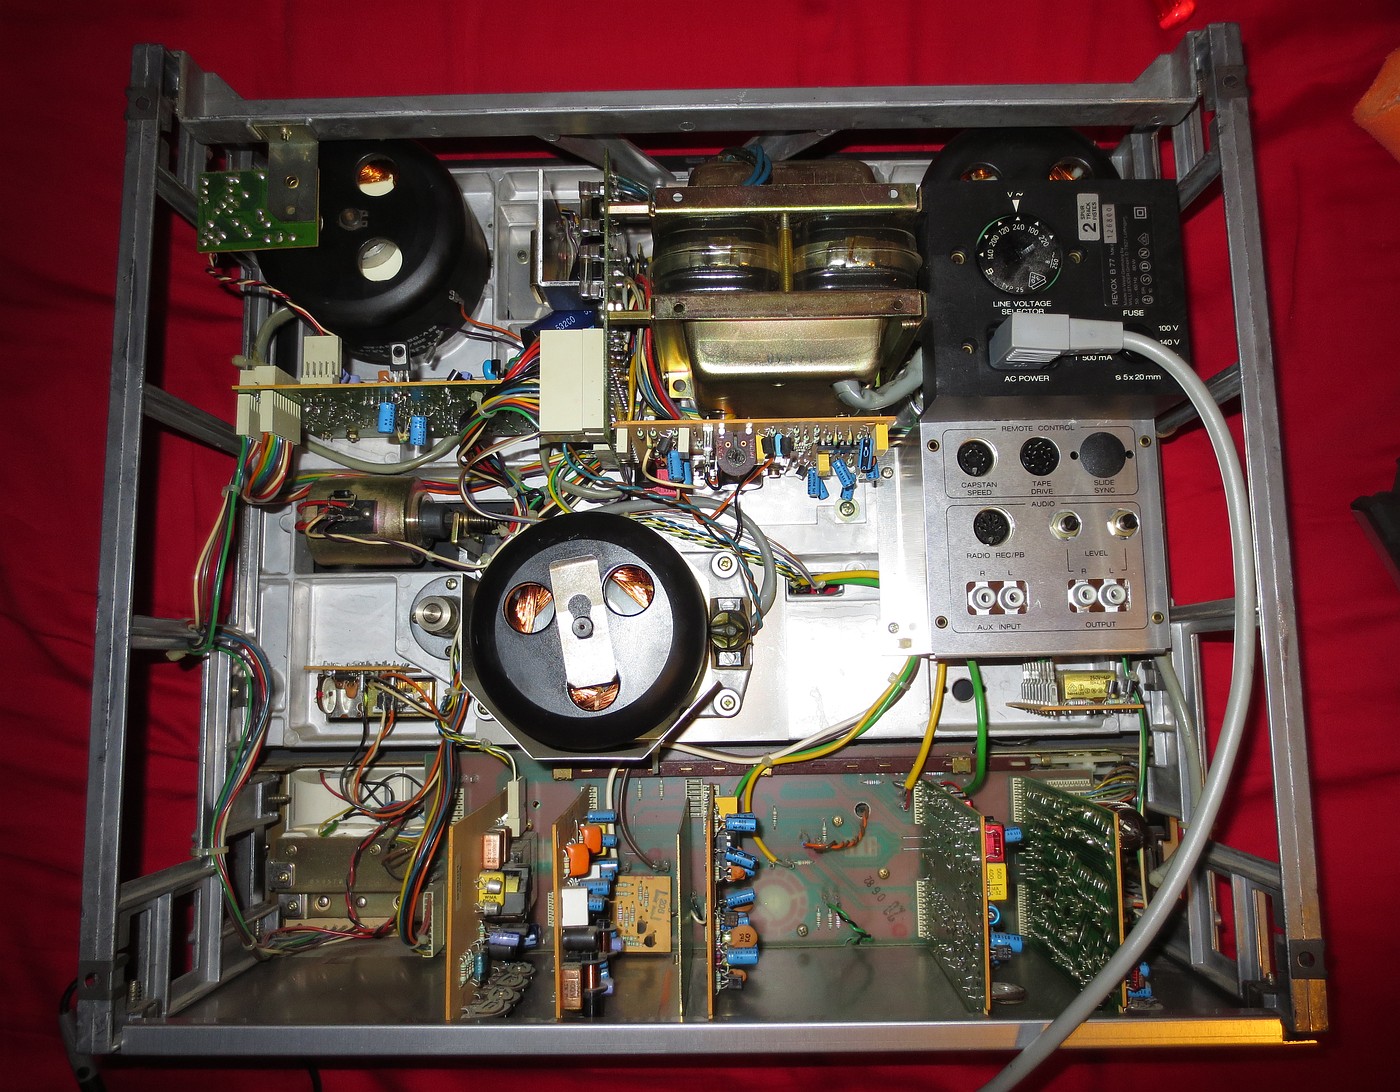 Taking off the back cover. Now that’s some neat hand- and legroom to work in!
And even though the machine was offered with either 2-track or 4-track heads, the front panel is designed for the (home) user to consider “channels left and right”, i.e. with a stereo action in mind, that is: tracks 1 and 2 in a half-track configuration, or tracks 1-4 or 3-2 in a quarter-track deck. Of course, the 4-track variants were the “consumer setup” ones, i.e. 2 tracks in one direction, and the other two in the other direction.
With a half-track machine like I have, that’s either 2 tracks in one direction (stereo), or in case of a classic mono recording, one track (“left channel”) per one direction, and the second track (“left channel” still) in the other direction, too. Of course, nothing prevents me from recording the mono second track in the same direction as the first track, but a tape recorded like this would then not be according to the standards, and it won’t be played properly on a purely mono machine (as it’d play in reverse).
 Studer, Studer, and Studer once more so that you won’t forget
Now, my particular example was made somewhere in the mid 1980s in the town of Löffingen, in what was then West Germany. It is a 2-track variant with NAB (Ampex) equalization: i.e. the 0 decibel reference (0,775 V) corresponds to a magnetic flux of 257 nanowebers per meter. And, never been touched from the inside; apart from the dust settled in, the machine was in a virgin state, the calibration pots never been tweaked, with no holes in the paper of the bottom panel.
 Hoi du!
And of course, an untouched, virgin state does not automatically mean a fully functional state, you can be almost 100% sure about that when it comes to R2R machines. The disintegrated plastic belt driving the tape counter mechanism was the first “hello” the machine gave me upon taking the front panel cover off.
 One of the stink bombs waiting to explode
The rest was a little bit more serious, but no permanent damage had been done to the machine prior. Inside, the machine provided a safe haven for a handful of “Frako” brand electrolytic capacitors that ended up in a dead short, a situation I’ve so far seen mostly when it comes to tantalum capacitors only. Thankfully, these capacitors only shorted out the signal path, and as a result, the machine was completely deaf on the left channel. But these Frakos were also employed near the power circuits like the rectifier, to filter out ripple, and you don’t want to give them that chance. 🙂
Pictured above is a RIFA EMI suppression capacitor (X2) that has a semi-cracked casing, due to its epoxy that has been reacting with the humidity in the air for a couple of decades, and so their dielectric strength leaves a lot to be desired. When these X2 caps fail, they mostly do in an open-circuit, so the machine releases some magic smoke, but it happily continues spinning away. 🙂
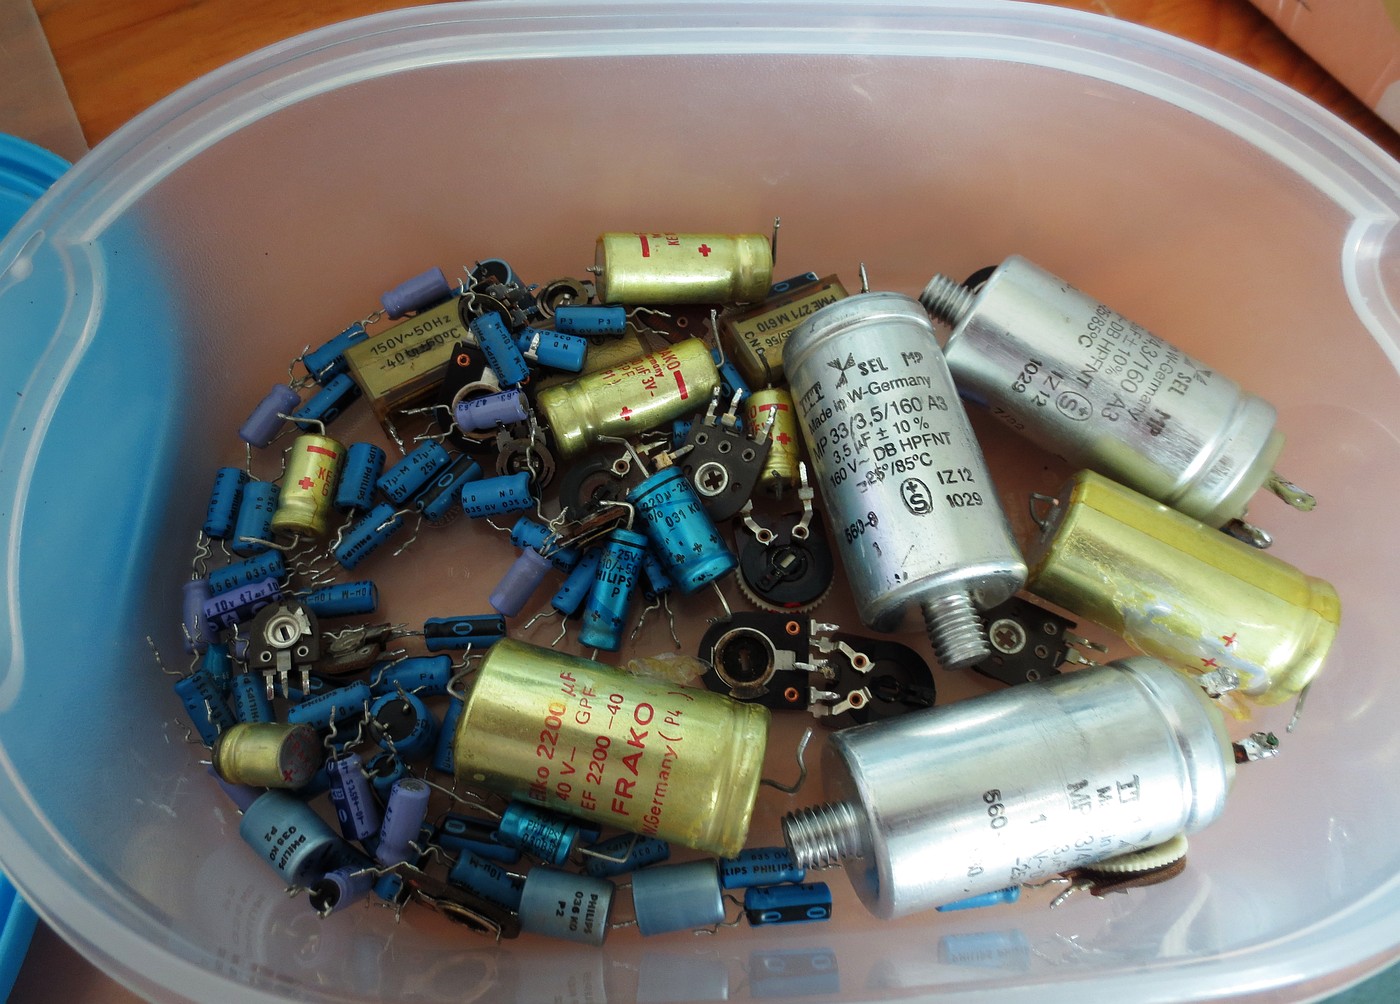 Re-capped. The three motor run capacitors were still fine, but I gave the rig a fresh set nevertheless.
The rest of the capacitors were of the small Philips ones, in the 1u-22u range; (this is one of the earlier MKII machines that hasn’t replaced every one of them with tantalums). A couple of these capacitors had a high ESR, and so the increased ripple caused a couple of strange problems with the tape drive control, especially “ghost playback” (starting in the Play mode all by itself) if the tape transport was loaded with tape, i.e. with the infrared tape sensor blocked.
 Screwdriver-phobia
And of course the untouched trimmers were full of dust and oxidised. Any attempt on recalibrating the machine, after the recap, also involves replacing any faulty trimmers that disintegrate on the slightest touch of a screwdriver. Nothing out of the ordinary, if the trimmers are not of the “enclosed carbon track” type.
 Cleaning the hubs, the brakes and installing new brake springs
Before any calibration, the machine needs to be in a good mechanical shape. The brakes needed some thorough cleaning with a solvent, and a new pair of springs for both hubs, so that they actuate properly on all sorts of reel size the machine supports, without any signs of tape tension problems (especially when stopping a fast forward or rewind using ten inch reels).
 Ready for a recalibration, new pots are in
And unlike the portable Nagra I have, this machine has a solid service manual that can be obtained online. In there, the rig is stripped to the last possible screw and aside mechanical and electrical schematics, it also provides detailed step-by-step instructions how to perform a full factory setup (with the proper tools on hand).
 During calibration (here of the bias), on a SM911 tape.
I’ve decided not to install the bottom plate, to keep that paper cover without holes.
After a recap, you always need to perform recalibration, which involves sorting out any mechanical issues of the tape transport before attempting to fiddle with the electronics themselves. The details can be easily followed in the service manual, but the basics to set up a machine like this require the usage of an oscilloscope, a function generator or a good sound source, an AC (milli-)voltmeter, tape transport degausser (I used a 24 volt relay coil hooked up on a 100 V, 50Hz source, turned on far away) and a good test tape, to set the playback head azimuth and playback equalization. Also, this test tape needs to be recorded with the equalization standard that is specified on the back of the machine (so either NAB or IEC).
Then you also need to use a good studio blank tape to adjust the recording head and equalization, for both speeds. by using a good audio source. But a proper factory set-up also involves measuring the distortion and wow/flutter ratios, this was unfortunately out of my reach.
 Calibrating VU meters’ 0dB for the 0,775V audio input
Aaaaand while at it, I have also decided to modify the original internal varispeed control, that normally allows to set a speed deviation between ± 10% (or ± 2 semitones, if you want), so that it can regulate between the full speed deviation, which would be normally possible only using the external “box” varispeed control. Both of these circuits are almost identical (it’s an LM301 voltage source), with the exception that the external box allows switching between coarse and fine speed regulation. For more details, see sections 7/27 and 7/28 in the service manual – you need to modify the original R2+R3 and R4+R5 values to match the external varispeed ranges (-30% to +50% of speed deviation).
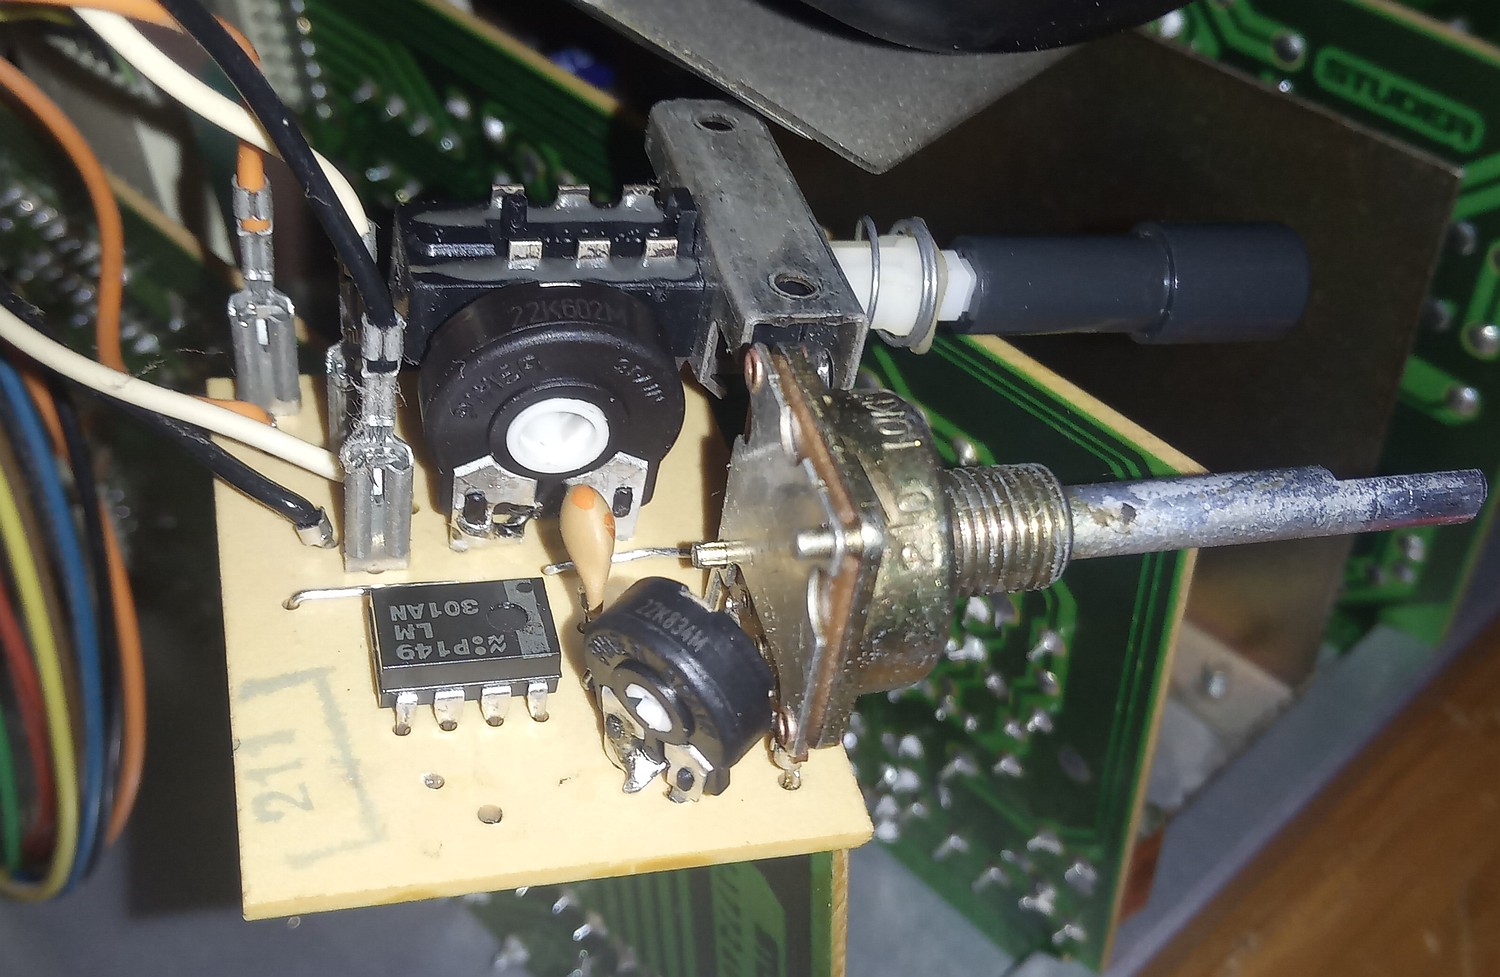 Modifying the internal variable speed circuit for a full speed deviation
(the non-standard resistor values are replaced with trimpots here)
Of course, this is still not enough to make a 7.5 IPS machine spin at 15 IPS, as a “High Speed” variant. These have different capstan sizes and equalization presets. However, if you run the 7.5 IPS Revox from a 60 Hz mains, like in America or certain places in Japan, you are able to modify the capstan speed control circuit’s time constant to enable playback at 15 IPS; however, the equalization will be wrong and you won’t be able to record properly unless you tweak it.
 Something’s missing, eh?
And also the decades old surface finish (the Swiss call this the “Nextel”) off the reel hubs has started flaking away. Since these hubs are aluminum, it if starts being sticky or flaky, it does absolutely no harm getting it all completely off, perhaps sanding and polishing them a little; aluminum is not going to corrode in a normal environment this machine is going to be operated in.
You can also have these reel hubs refinished, certain individuals are providing a service like this, or you can use the hubs off a Revox A77 if those are in a good shape. However, if using metallic reels, be sure you always use rubber gaskets underneath them, i.e. between the hub and the reel, otherwise you can get some of the Nextel deposits on your aluminum reels.
Also a similar surface finish is also applied on the cage of the machine itself – be careful around with solvents – or you can put the machine inside some of the newly-made wooden enclosures that are currently being sold.
While cleaning the thing, I have also managed to wipe off the Revox brand text from the aluminum head cover. You perhaps have noticed it already, in the very first picture, but it’s not that I care about that at all…
Of course, parts for this machine are plentiful – you can get an original head cover, or one with a big fat “STUDER” ensign on it, if desired.
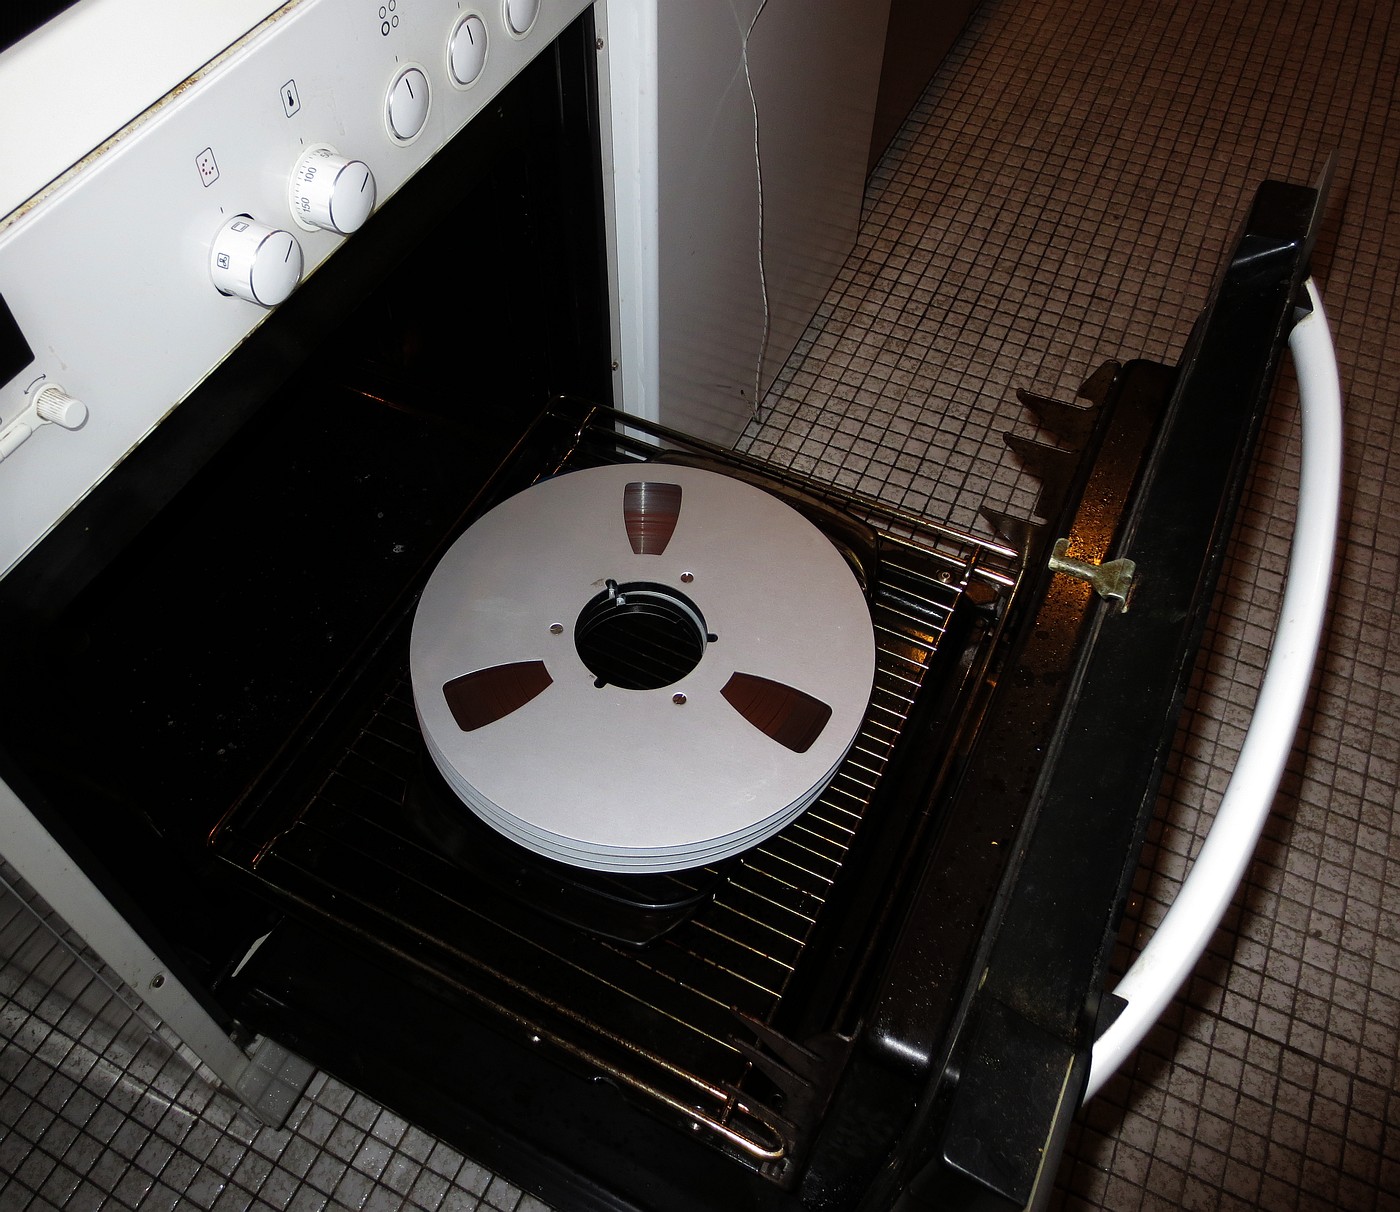 What’s for dinner?
And, of course, to listen to old studio tapes, you might have to dehumidify them first, especially those back-coated ones. Otherwise, they may start shedding away their oxide deposits with some ugly screeching during rewinding, or (in the worst case scenario), during playback, messing up the tape transport or even stopping it from moving completely.
This “tape baking” process can help the tapes to be readable (and thus, digitizable) for a couple of weeks or months, before being unplayable again. You do need to make sure the tapes are on metallic reels, and that the hot air does not get past some 60 degrees – or the central NAB hub can melt and you won’t be able to put the reel back on the machine. In my case, I’ve just used an oven with a semiconductor temperature sensor – and a multimeter. Connoisseurs can go for expensive food dehydrators to achieve this… 🙂
Update April 2022: Over time, the machine developed wow and flutter issues playing small reel tapes, even with the tape tension switch properly actuated. Officially, the B77 shall be used with at least 7 inch (18cm) reels due to their larger hub diameter; smaller (15, 13cm) reels started to be unlistenable after half of tape, getting progressively worse to the end of the tape. When this happens, the left (supply) reel is very easy to stop with a slight touch of your fingertip, indicating tape tension issues.
This usually requires inspection of the pinch roller and its pressure, proper alignment of the pinch roller actuator (electromagnet -solenoid- must be fully bottoming out on PLAY action) and inspecting the capstan shaft. Also, with a quick “nail” test, the rubber on the roller shall immediately return back without leaving an imprint, or else the roller is hardened and needs to be replaced. Utilizing the service manual, the pinch roller pressure shall be set to 13N (approx. 1.3kg), otherwise, the electromagnet position needs to be adjusted for proper clearance (of about 0,5 to 0,8mm as indicated) and then re-checked.
At inspection, the capstan shaft shall be matte – and it gets polished over time, causing tape slippage and tension issues. The official way is to have the capstan bead-blasted, or having the surface uniformly roughened by means of a sandpaper temporarily glued over the whole pinch roller’s active surface. Abrading the capstan, i.e. holding the sandpaper stationary, is a no-go as it permanently alters the speed of the machine, and causes more issues.
I have also found out that my left tape tension arm provided no dampening action. It swung right up after being pushed with a finger, and it provided almost no resistance, this was especially visible during fast forward or rewind as a jerky motion. This was mitigated by carefully dismantling the arm from the panel and reapplying a high viscose fluid into the shaft. I used the 500 000 cSt RC differential fluid that I have also applied into a tonearm damper of the Audio-Technica AT LP-120. The tension arm now takes approximately half a second as it slowly returns back up, and it does not jerk up-and-down during rewinds.
After these updates were applied, the machine was again usable even with the smaller reels. Unfortunately, I don’t own a wow/flutter test tape so I’m not currently able to post the results of the treatment.
Is there anywhere in the US where you can get a legitimate refurbishment of a B77? I have one that is little used but needs to be brought up to snuff. I hate to toss it in the trash when it looks so pretty (pristine). For instance, it poops out on rewind and I’m told that the motors deteriorate over time even when it isn’t used for 30 years. A local repair guy who is very reputable says forget it…and don’t believe it when someone tells you they can fix it.
Cannot give you an advice on a good repairman since I’m over the pond here (and I consider myself more of a tinkerer than a “restaurator”), but you need to take the opinions of others with a grain of salt sometimes.
While it is true that everything deteoriates over time, getting a B77 to spin and play tapes is not exactly rocket science; these machines are not complex and they provide enough head- and legroom to work on.
Of course there is a difference between that and making it a museum piece, with everything aligned like if it came from the factory the other day. But saying that an AC motor just kicks the bucket all by itself after a couple decades of off time, is quite laughable. My late great-grandfather’s 380 volt, three phase circular saw, would chop that guy’s fingers off as effectively, as it could seventy years ago.
To address your rewind problem: check the big 3 run capacitors in your machine, one is used for the capstan motor, the other two for the reels. If you don’t have a meter, replace all three, caps are cheap. Also check, if both reels spin freely with the brake solenoid disengaged, to rule out bearings, also check the brake operation if they don’t stick. If all seems fine, inspect the TRIAC board.
I mean, unless you actually cause physical damage, e.g. overvoltage, overheating, intra-winding shorts or purely mechanical issues such as a worn out bearing, an induction motor is virtually immortal, and you mention that your machine looks seldomly used. An AC motor is not a combustion engine with all sorts of rubber seals and rings to go faulty just sitting over time.
Hell, I have Iron Curtain tape recorders whose motors had bearings that were bone dry due to overheating, had indents causing them to run out and squeal, but they still spin those tapes like no tomorrow…
Hello,
Recently purchased a b77mk11 and all seems to be working fine except the stereo position on the selector. It does not record or playback on the right side only, left seems fine. The mono position will record and play. Any suggestions where I should first look.
Thank you.
Kind of a late response now, but you need to check the signal path. I also had this Revox completely deaf on one channel and this was caused by one of the Frako capacitors getting into a hard short against ground.
Hi,
Great read.
Had a problem with the pots and switches being intermittent on my Mk1 B77. Simple fix due to the superb Revox design. Removing the switches from the PCB via the two self tapping screws reveals the contacts on the PCB tracks and the gold plated wiper. A clean with PCB cleaner gets them working perfectly. I also removed the two record level pots and loom and blew them out with an air line through the slots and then liberally applied PCB cleaner. A nasty yellow looking substance came out! After that they worked smoothly all way from 1 to 10. No need for replacement.
I haven’t found the need to change any capacitors yet except the exploding X2 mains filter part!
Hi,
I have conducted a refurbishment of a B77 mkII and re-calibration with new old stock heads (two track). Replaced all electrolitc capacitors showing high ESR and socketed all chips. All mechanical parts seem to be in good condition, have another low speed 1 7.8 + 3 3/4 machine to rat bits from when required.
I have just started on a refurbishment of a A77 mkIV machine, big and expensive task ahead it would appear. The transport electro mechanical board had the dreaded Rifa capacitors on with cracks, one had gone s/c and taken a series 4.7 ohm resistor with it. I noticed this as soon as the machine was out of the case so they were all replaced before power was applied. They are for contact spark suppression in the relays. One meter with leads cut and o/c (one out of this machine was taken with the u/s one replacing I suspect).
A new pair will set me back $250 odd Australian and I have just started, too many non technical people out there making money from Revox parts. Hoping to write this up as an electronics magazine article to obtain some of my costs back. It played a test tape and the heads are not too worn but I need the meters to conduct recording tests.
Regards Robert (electronics tech of 50 years in the trade now, need a new body)
Fantastic. Great read.
Would you share some info on modding the on board varispeed so it does the remote trick?
Hi,
yes, it’s not difficult. Here is a schematic of the internal varispeed, and here of the external accessory. To get the full speed “coarse” deviation, desolder and replace R3 and R2 of the internal circuit with one 16k2 resistor (or use a trimpot, as I did). Or use two resistors that add up into 16.2 kohms, as R3 and R2 are in series.
The same approach for R5 and R4: there shall be a 5k7 resistance in sum. R5 is actually a 4k7 trimpot, so all you need to do is to replace R4 with a 1k-ish value (or 1k5, 2k2 etc) and tune the trimpot so that both R5 and R4 give 5k7 resistance in sum. The original value of R4 is 24k, so you need to bring it down.